Developer Guide
Table of Contents
- Acknowledgements
- Getting started
- Glossary
- Design
- Implementations
- Documentation, logging, testing, configuration, dev-ops
-
Appendix: Requirements
- Product Scope
- User Stories
-
Use Cases
- Use Case: UC1 Purge/Delete all sample student records
- Use Case: UC2 Create a student record
- Use Case: UC3 Upload student records
- Use Case: UC4 View a student record
- Use Case: UC5 Delete a student record
- Use Case: UC6 Edit a student record
- Use Case: UC7 Download student records
- Use Case: UC8 Create a lab record
- Use Case: UC9 Edit a lab record
- Use case: UC10 View dashboard of student records
- Use case: UC11 Filter student records
- Non-Functional Requirements
- Appendix: Instructions for Manual Testing
- Appendix: Effort
1. Acknowledgements
ProgrammerError(PE) makes use of the following third-party libraries:
- Libraries used: JavaFX, Jackson , JSON In Java, opencsv , JUnit5
2. Setting up, getting started
Refer to the guide Setting up and getting started.
3. Glossary
- Mainstream OS: Windows, Linux, Unix, OS-X
- Student ID: NUS student matriculation number (AXXXXXXXY)
- Email: NUS student email (eXXXXXXX@u.nus.edu)
- TA: CS2100 lab teaching assistant
- PE: ProgrammerError
- CSV: Comma-Separated Values
4. Design
4.1 Architecture
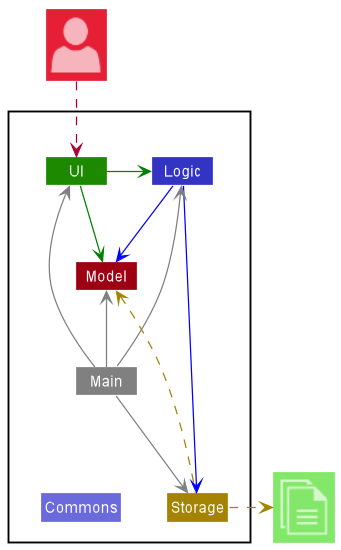
The Architecture Diagram given above in Figure 4.1.1 explains the high-level design of PE.
Given below is a quick overview of main components and how they interact with each other.
Main components of the architecture
Main has two classes
called Main
and MainApp. It
is responsible for,
- At app launch: Initializes the components in the correct sequence, and connects them up with each other.
- At shut down: Shuts down the components and invokes cleanup methods where necessary.
The rest of the App consists of four components.
-
UI: ProgrammerError’s UI. -
Logic: The command executor. -
Model: Holds the data of ProgrammerError in memory. -
Storage: Reads data from, and writes data to, the hard disk.
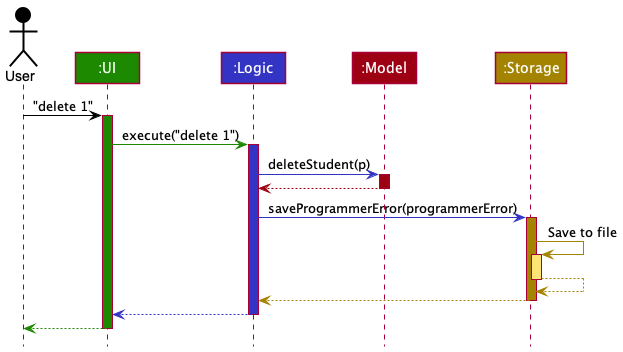
How the architecture components interact with each other
The Sequence Diagram in Figure 4.1.2 shows how the components interact with each other for the scenario where the user issues
the command delete 1.
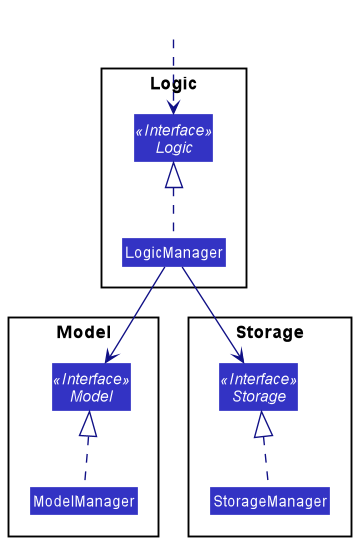
Each of the four main components (also shown in the diagram above),
- defines its API in an
interfacewith the same name as the Component. - implements its functionality using a concrete
{Component Name}Managerclass (which follows the corresponding APIinterfacementioned in the previous point.
For example, the Logic component defines its API in the Logic.java interface and implements its functionality using
the LogicManager.java class which follows the Logic interface. Other components interact with a given component
through its interface rather than the concrete class (reason: to prevent outside component’s being coupled to the
implementation of a component), as illustrated in Figure 4.1.3 below.
The sections below give more details of each component.
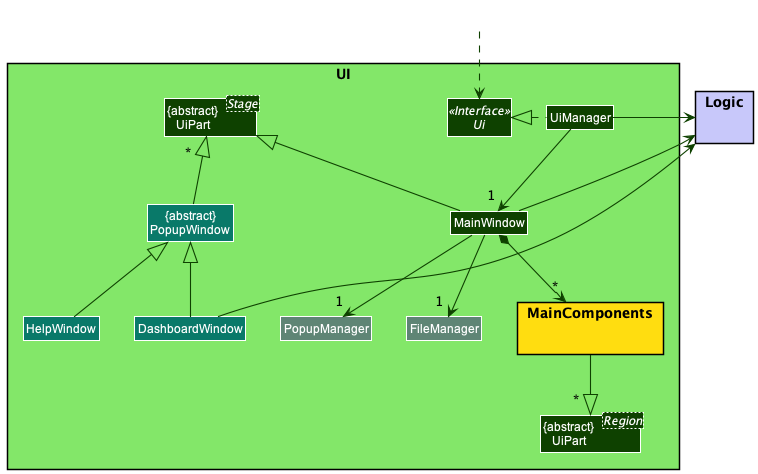
4.2 UI component
The API of this component is specified
in Ui.java
At a high level, the MainWindow component interacts with 3 other main components: Logic, PopupManager and FileManager (Figure 4.2.1).
Note that the components under MainWindow have been omitted for simplicity and will be shown in greater detail in Figure 4.2.2.
- Firstly,
MainWindowinteracts with theLogiccomponent to determine which data to display to the user. - Secondly,
MainWindowconducts file operations on the UI through aFileManager. For instance, theFileManagerhandles situations where the user is required to select files or directories. - Thirdly, to manage the display of popup windows to the user,
MainWindowinteracts with aPopupManagerwhich handles the configuration, creation and showing of popups on the UI.
In addition, there are two additional windows that the UI can display: HelpWindow and DashboardWindow. They inherit
from the abstract class PopupWindow, which captures the commonalities between classes that represent popup information
to be displayed to the user.
Now taking a closer look at the MainWindow component, it consists of a number of parts e.g.CommandBox, ResultDisplay, StudentListPanel
, StatusBarFooter etc. (Figure 4.2.2). These components, including the MainWindow, inherit from the abstract UiPart class which captures
the commonalities between classes that represent parts of the visible GUI. The following is a summary of the parts of the MainWindow.

Note that the UI component uses the JavaFx UI framework.
-
The layout of these UI parts are defined in matching
.fxmlfiles that are in thesrc/main/resources/viewfolder. For example, the layout of theMainWindowis specified inMainWindow.fxml -
The styling of the UI components are defined in the
src/main/resources/view/cssfolder.
The UI component,
- executes user commands using the
Logiccomponent. - listens for changes to
Modeldata so that the UI can be updated with the modified data. - keeps a reference to the
Logiccomponent, because theUIrelies on theLogicto execute commands. - depends on some classes in the
Modelcomponent, as it displaysStudentobject residing in theModel.
4.3 Logic component
API : Logic.java
Figure 4.3.1 shows a (partial) class diagram of the Logic component:
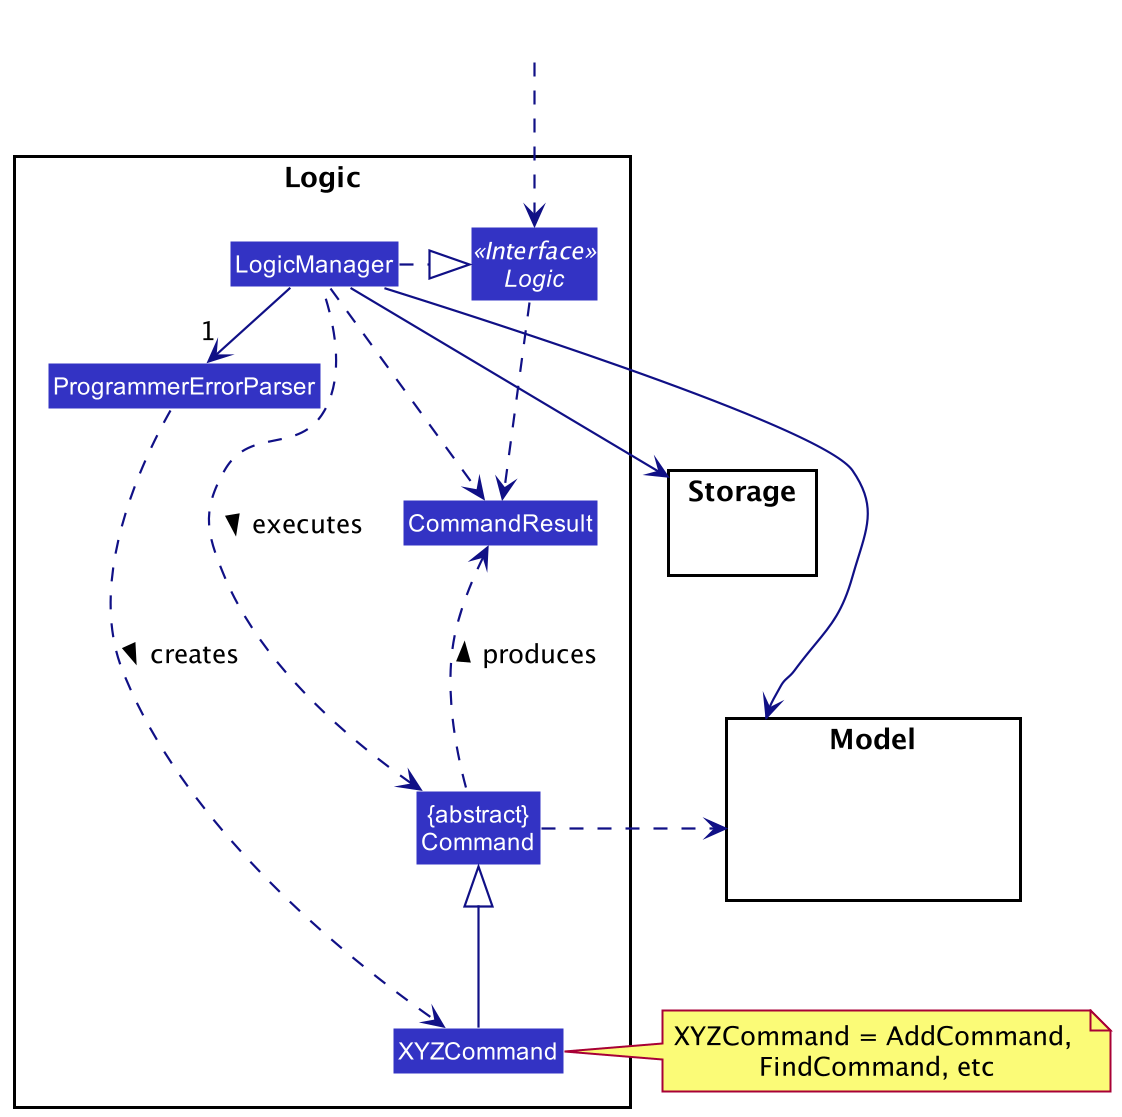
How the Logic component works:
- When
Logicis called upon to execute a command, it uses theProgrammerErrorParserclass to parse the user command. - This results in a
Commandobject (more precisely, an object of one of its subclasses e.g.,AddCommand) which is executed by theLogicManager. - The command can communicate with the
Modelwhen it is executed (e.g. to add a student). - The result of the command execution is encapsulated as a
CommandResultobject which is returned back fromLogic.
The Sequence Diagram in Figure 4.3.2 below illustrates the interactions within the Logic component for the execute("delete 1") API
call.
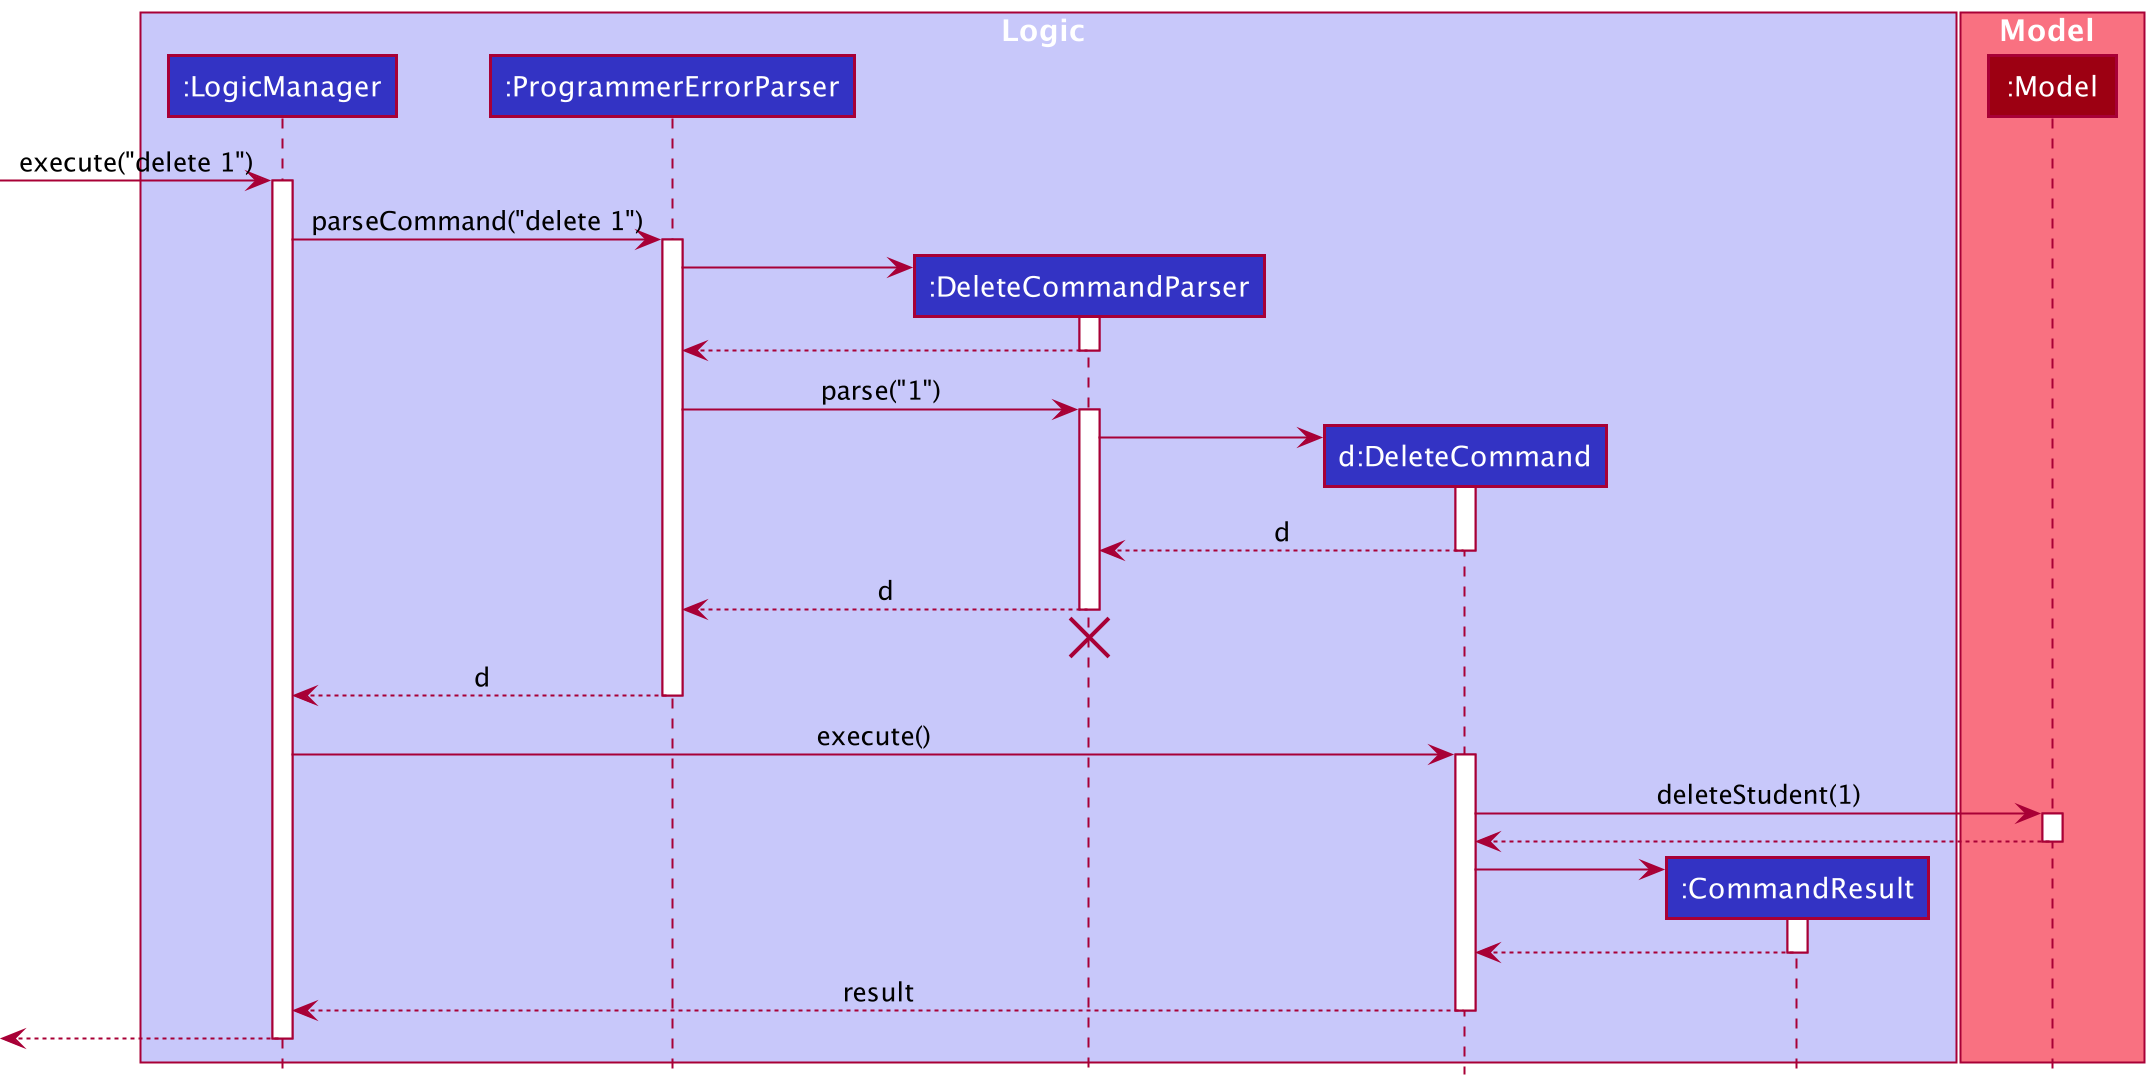
DeleteCommandParser should end at the destroy marker (X) but due to a limitation of PlantUML, the lifeline reaches the end of diagram.
Figure 4.3.3 illustrates the other classes in Logic (omitted from the class diagram above) that are used for parsing a user command:
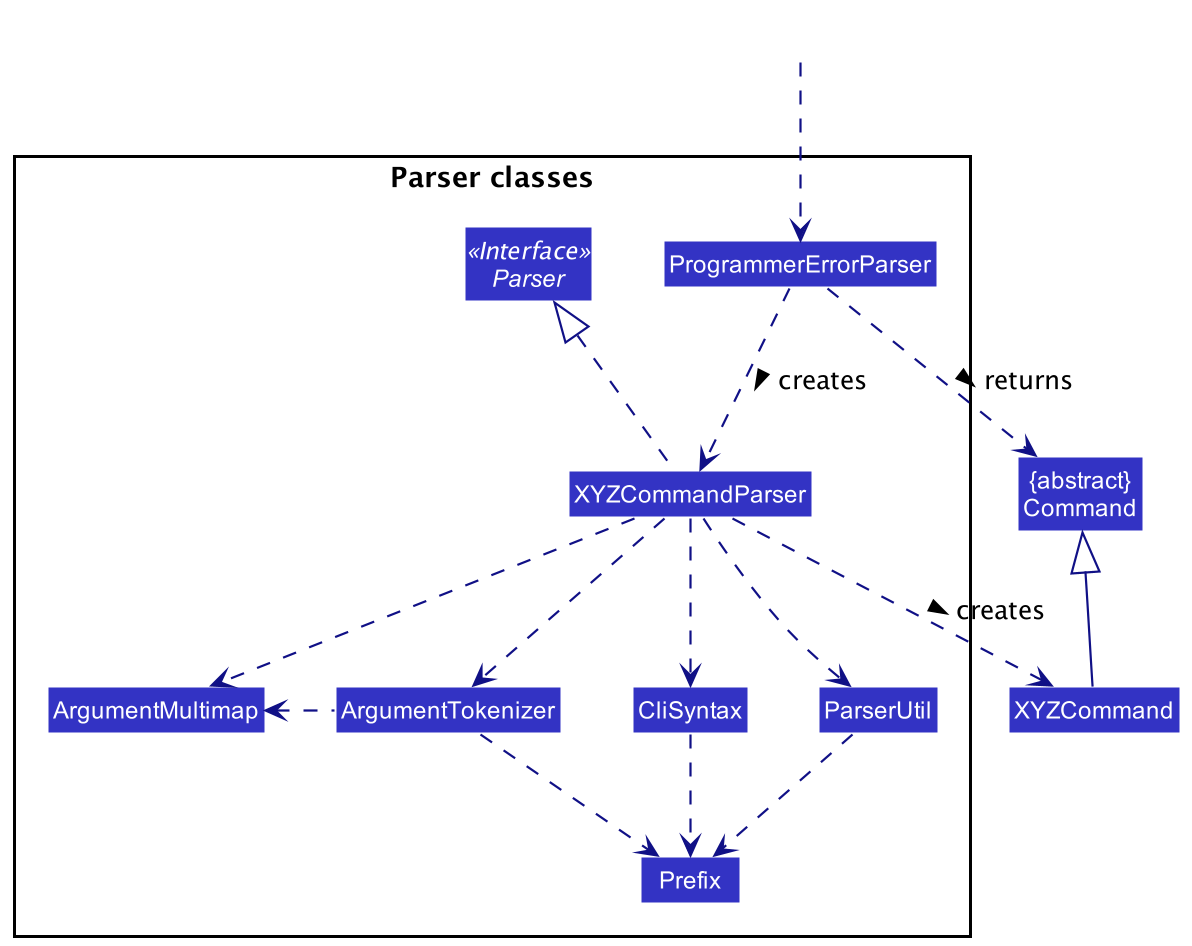
How the parsing works:
- When called upon to parse a user command, the
ProgrammerErrorParserclass creates anXYZCommandParser(XYZis a placeholder for the specific command name e.g.,AddCommandParser) which uses the other classes shown above to parse the user command and create aXYZCommandobject (e.g.,AddCommand) which theProgrammerErrorParserreturns back as aCommandobject. - All
XYZCommandParserclasses (e.g.,AddCommandParser,DeleteCommandParser, …) inherit from theParserinterface so that they can be treated similarly where possible e.g, during testing.
4.4 Model component
API : Model.java
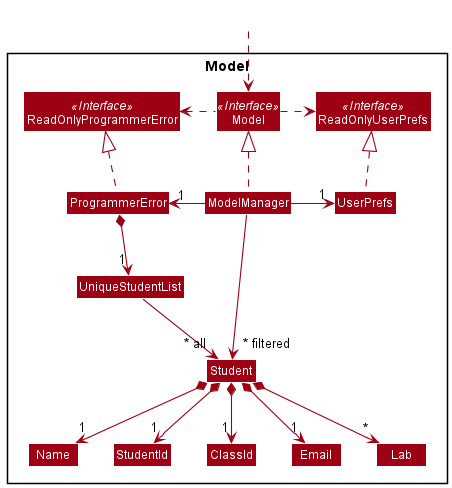
The Model components as seen in Figure 4.4.1,
- stores the ProgrammerError data i.e., all
Studentobjects (which are contained in aUniqueStudentListobject). - stores the currently ‘selected’
Studentobjects (e.g., results of a search query) as a separate filtered list which is exposed to outsiders as an unmodifiableObservableList<Student>that can be ‘observed’ e.g. the UI can be bound to this list so that the UI automatically updates when the data in the list change. - stores a
UserPrefobject that represents the user’s preferences. This is exposed to the outside as aReadOnlyUserPrefobjects. - does not depend on any of the other three components (as the
Modelrepresents data entities of the domain, they should make sense on their own without depending on other components)
4.5 Storage component
API : Storage.java
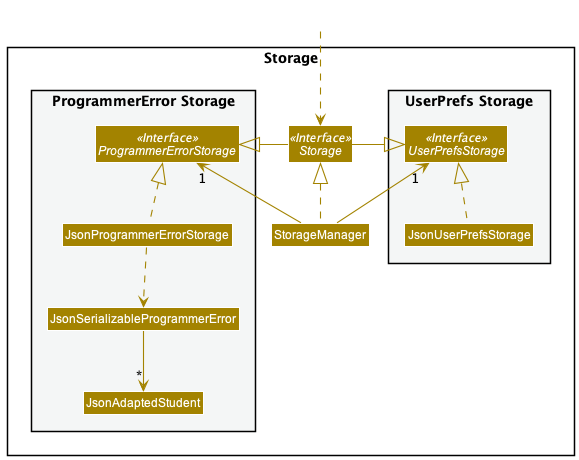
The Storage components as seen in Figure 4.5.1,
- can save both ProgrammerError data and user preference data in json format, and read them back into corresponding objects.
- inherits from both
ProgrammerErrorStorageandUserPrefStorage, which means it can be treated as either one (if only the functionality of only one is needed). - depends on some classes in the
Modelcomponent (because theStoragecomponent’s job is to save/retrieve objects that belong to theModel)
4.6 Common classes
Classes used by multiple components are in the seedu.programmer.commons package. Commons represents a collection of classes used by multiple other components.
5. Implementation
This section describes some noteworthy details on how certain features are implemented.
5.1 Add Student Feature
Implementation
The add student feature allows the CS2100 Lab TAs to add a new student into the student list. Its implementation introduces the following classes:
-
AddCommandthat extendsCommand -
AddCommandParserthat implementsParser<AddCommand> - Student information:
Student,Name,StudentId,ClassId,Email,UniqueStudentList
The syntax of this command is add -n <NAME> -sid <STUDENT_ID> -cid <CLASS_ID> -email <EMAIL>. For instance,
add -n Erwin -sid A0234596H -cid B02 -email e0543221@u.nus.edu will create a student with the given name, student id,
class id and email.
Given below is a possible usage scenario:
The CS2100 TA keys in the command add -n Erwin -sid A0234596H -cid B02 -email e0543221@u.nus.edu.
The mechanism is as described below:
- Upon detecting
addas the command word.ProgrammerErrorParserwill create aAddCommandParserwith the input name, student id, class id and email. -
AddCommandParserparses the name, student id, class id and email and creates aStudentobject. It will then create aAddCommandwith the newStudentobject. -
AddCommandreceives the newStudentobject and checks if any student inUniqueStudentListshares the samestudentIdandemailwith the newly created student. - If the new
Studentis unique it will be added to theUniqueStudentList. - ProgrammerError will show a success message for adding the student. For example,
New student added: Erwin; Student ID: A0234596H; Class ID: B02; Email: e0543221@u.nus.eduin theresultDisplay, informing the user that the add operation is valid.
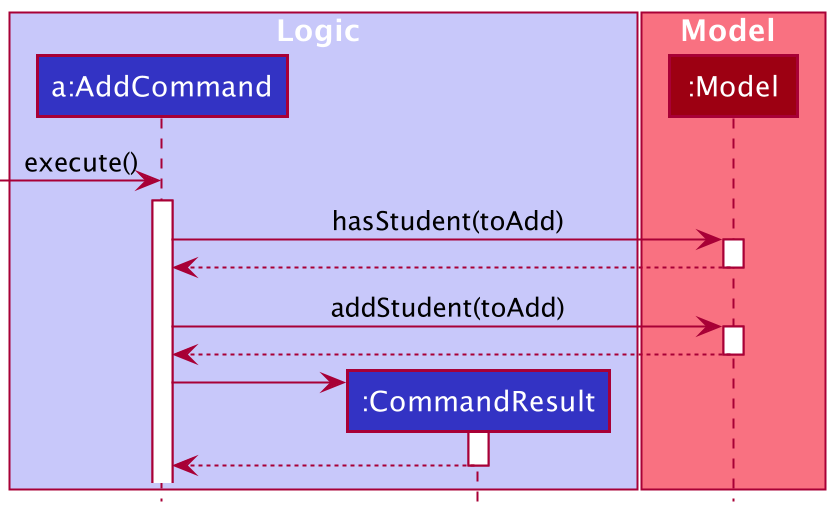
The following (partial) sequence diagram in Figure 5.1.1 shows how the add command works:
- Note: toAdd in the sequence diagram represents the new
Studentobject to be added. - Refer to Logic component for a review of the Logic Component.
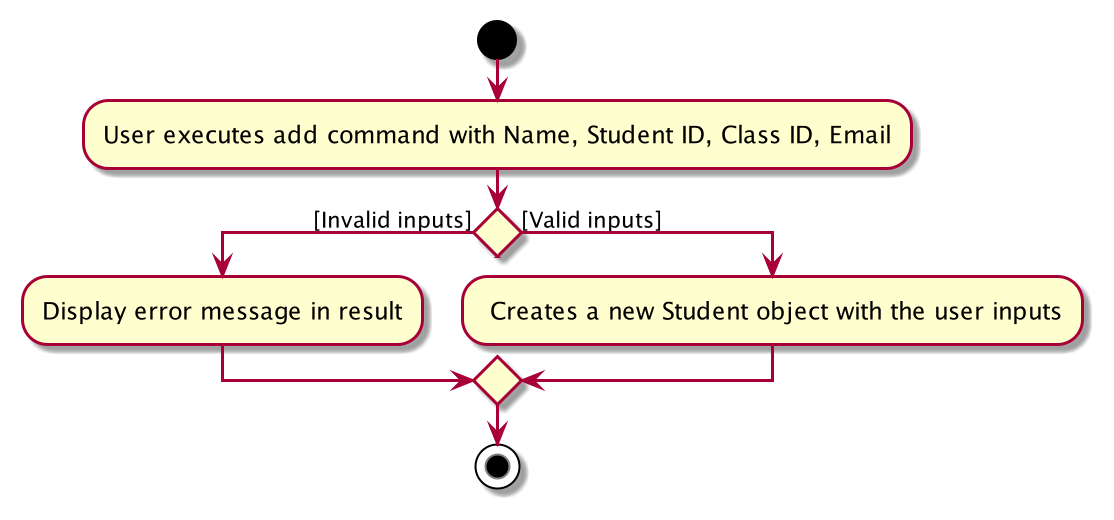
The following activity diagram in Figure 5.1.2 summarizes what happens when a CS2100 TA executes a new command:
Design considerations:
Aspect: Only unique Student ID and email is accepted:
- Each student object should have unique Student ID and email.
- Pros:
- Ensures that each student is unique and easily identifiable with the key attributes.
- Ensures that there are no duplicates and redundant data.
- Cons:
- The strict checks on the
UniqueStudentListwill affectEditCommandwhen the user tries to edit an existing student. This will happen when the user only wants to edit one of the attribute. (For example, studentId.) This newly edited student will have an old copy of the email. This side effect will cause the newly createdstudentto clash with its old instance inUniqueStudentList, causing the command to fail, even though it should be valid. As such, it makes it hard to implement, as we have to ensure that it works withEditCommandas well.
- The strict checks on the
- Pros:
5.2 Filter Student List Feature
Implementation
The filter feature allows the CS2100 Lab TAs to filter the student list in ProgrammerError based on any combinations
(but at least one) of the following 4 optional parameters: Name, StudentId, ClassId and/or Email.
Its implementation introduces the following classes:
-
FilterCommandthat extendsCommand -
FilterCommandParserthat implementsParser<FilterCommand> -
QueryStudentDescriptorthat contains the user input of the corresponding student information to be queried with. -
StudentDetailContainsQueryPredicatethat implementsPredicate<Student>to test if a student matches the fields as specified inQueryStudentDescriptor.
The syntax of this command is filter [-n <NAME>] [-sid <STUDENT_ID>] [-cid <CLASS_ID>] [-email <EMAIL>].
For instance, filter -cid B01 will filter and show all the students in the list whose class ID contains the character
sequence “B01”.
This is designed for the target users who are fast typists to efficiently filter the list as desired.
The implementation of the filter mechanism is facilitated by the StudentDetailContainsQueryPredicate that contains a
private field of type QueryStudentDescriptor that will be used to test if a given student to the predicate matches all
the query fields in the QueryStudentDescriptor.
The following methods are further explained in greater detail for ease of understanding:
-
StudentDetailContainsQueryPredicate#test(Student)— Evaluates the predicate on the givenStudentargument. -
QueryStudentDescriptor#doesStudentMatchDescriptor(Student)— Evaluates if theQueryStudentDescriptorfields matches with the corresponding fields of theStudentargument. It is a match as long as the corresponding fields of theStudentargument contains the character sequence as specified in theQueryStudentDescriptor.
These operations are exposed in the Model interface as Model#updateFilteredStudentList(Predicate<Student>).
Given below is an example usage scenario and how the list filtering mechanism behaves.
Step 1. The CS2100 TA launches the application.
Step 2. The CS2100 TA executes filter -cid B01 to display all the students whose Class ID matches B01.
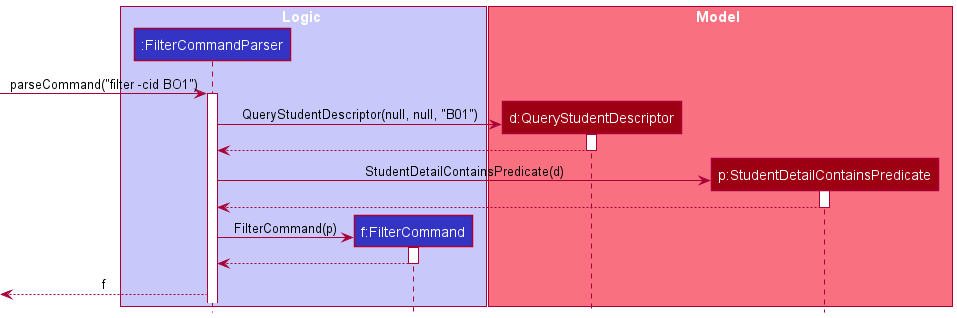
The following UML sequence diagrams shows how the filter command works:
- Figure 5.2.1 focuses on modelling the interactions between components to first create the
FilterCommandobject.
- In the next sequence diagram, Figure 5.2.2 focuses on the interactions between components when the
FilterCommandis being executed.
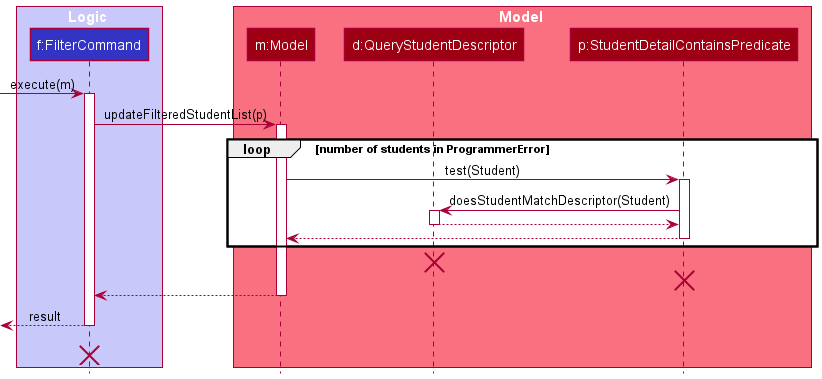
StudentDetailContainsPredicate
, QueryStudentDescriptor and FilterCommand should end at the destroy marker (X) but due to a limitation of PlantUML,
the lifeline reaches the end of diagram.
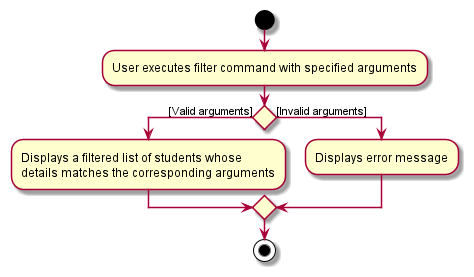
Figure 5.2.3 shows the UML activity diagram summarizing what happens when a CS2100 TA executes a new filter command.
Design Consideration
Aspect: How filter command executes
-
Alternative 1 (current choice): Filter commands can take in any combination of query parameters
(
-n,-cid,-sidand-email)- Pros: Allow for flexibility in the way the CS2100 Lab TA wants to filter the list.
- Cons: More difficult to implement and proper handling of the combinations of query parameters is needed.
-
Alternative 2: A different type of filter command to filter by each of the student’s attribute.
- Pros: Implementation does not need to consider the combination of query parameters.
- Cons: Multiple commands have to be executed to filter the list in more than one query dimension.
Aspect: How to handle combination of query parameters
-
Alternative 1 (current choice): Design a
QueryStudentDescriptorclass that abstracts the handling of the input query parameters.- Pros: Need not explicitly handle the different argument combinations at the higher-level abstractions
(e.g.
FilterCommandParserclass). Code is more maintainable. - Cons: Was more difficult to implement which required time to design the interactions among the components.
- Pros: Need not explicitly handle the different argument combinations at the higher-level abstractions
(e.g.
-
Alternative 2: Handle the different argument combinations in the
FilterCommandParserclass.- Pros: Easier to handle empty argument cases with explicit conditional checking.
- Cons: Bad use of abstraction, SLAP violated and long nested conditional statements. Code made harder for future extension.
Aspect: Naming the function
-
Alternative 1 (current choice): Calling it
filter.- Pros:
filteris an intuitive command word for the expected functionality. - Cons: From the user experience perspective, it is slightly longer than type than other alternative.
- Pros:
-
Alternative 2: Calling it
view.- Pros: It is shorter to type and less refactoring required from the code that this project evolved from.
- Cons:
viewis not as intuitive as other alternatives.
-
Alternative 3 (future consideration): Providing a shortcut command for
filter.- Pros: Allows for users to type less for the same expected behaviour.
- Cons: New users may be confused with such shortcut commands.
5.3 Show Lab Results Feature
Implementation
The show lab results feature allows the CS2100 TA to view the lab result list of a particular student. Its implementation introduces the following classes:
-
ShowCommandthat extendsCommand -
ShowCommandParserthat implementsParser<ShowCommand> -
ShowCommandResultthat extendsCommandResult
The syntax of this command is show <INDEX_IN_LIST>. For instance, show 1 asks ProgrammerError to display the lab
results of student at index 1 of the current list.
Given below is a possible usage scenario:
[Pre-Condition] There are 2 students in ProgrammerError, and the CS2100 TA has created some lab results for each of them.
Step 1. The CS2100 TA keys in the command show 1: The information of the student at index 1 as well as his/her lab
results are displayed on the side panel.
The mechanism is as described below:
-
Upon detecting ‘show’ as the command word.
ProgrammerErrorParserwill create aShowCommandParserwith the input index. -
ShowCommandParserparses the index and creates aShowCommand, which finds the student to be shown according to the index and creates aShowCommandResultwith the student identified.
Step 2. The CS2100 TA keys in show 2: The side panel is updated with the information and lab results of the student at
index 2
Step 3. The CS2100 TA keys in show 3: ProgrammerError will show an error message in the resultDisplay, warning the
user that the index is invalid. This is triggered by CommandException, which is thrown by ShowCommand.
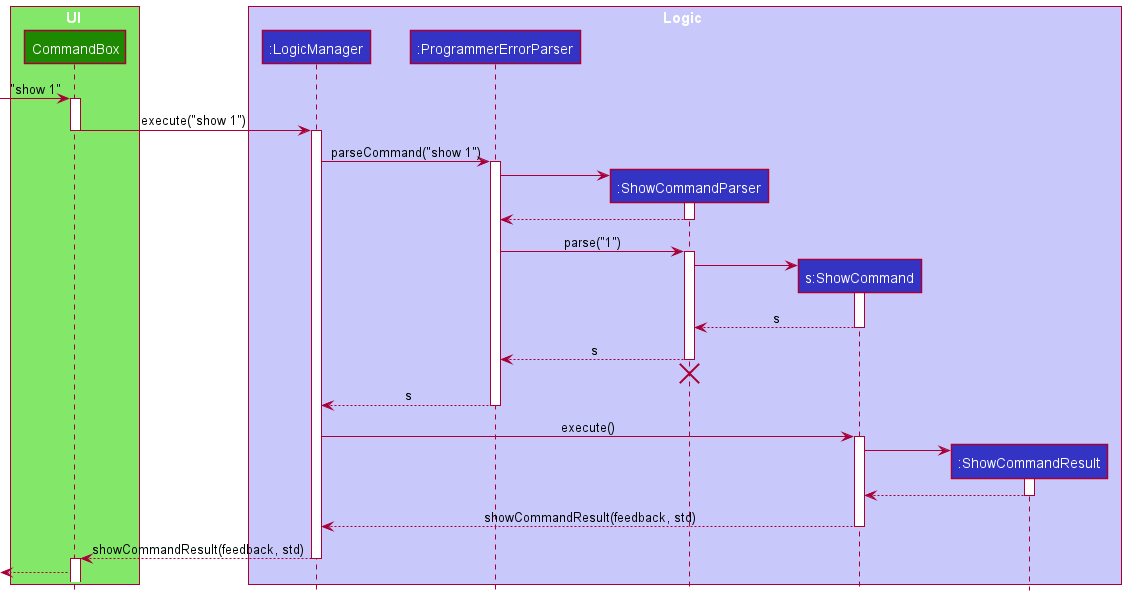
The following sequence diagram in Figure 5.3.1 shows how the show command works:
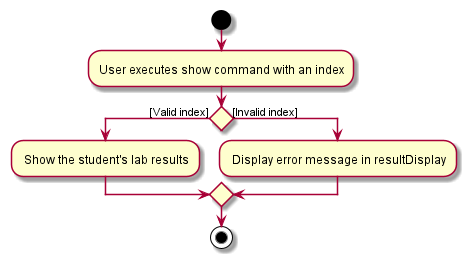
The following activity diagram in Figure 5.3.2 summarizes what happens when a CS2100 TA executes a new command:
Design considerations:
Aspect: How Show Lab Results executes:
-
Alternative 1 (current choice): Each student object keeps track of its own lab results by an ObservableList.
- Pros: Easy to implement; Lower chance of having mismatched student and lab records.
- Cons: Have to pass a
Studentinstance across different classes; May have performance issue if more attributes are added forStudent
-
Alternative 2: An ObservableList of lab results of every student in ProgrammerError itself.
- Pros: Potential improvement in performance by passing an index, instead of a
Studentinstance, across different classes. - Cons: Hard to implement, as we have to ensure the ObservableList of lab results and students have matching index
(ie
Studentinstance at index 1 of student list has its lab results at index 1 of lab results list), given that other operations such as add and delete can change the indexes easily.
- Pros: Potential improvement in performance by passing an index, instead of a
5.4 EditLab Feature
Implementation
The edit lab feature allows the CS2100 TA to edit the lab information for all students in the list. Its implementation introduces the following classes:
-
EditLabCommandthat extendsCommand -
EditLabCommandParserthat implementsParser<EditLabCommand>
The syntax of this command is editlab -ln <LAB_NUM> [-nln <NEW_LAB_NUM>] [-ts <NEW_LAB_SCORE>].
For instance,editlab -ln 1 -nln 2 -ts 20 asks ProgrammerError to edit the lab with lab number 1 to a new
lab number 2 with a new total score of 20.
Given below is a possible usage scenario:
[Pre-Condition] There are 10 students in ProgrammerError, and the CS2100 TA has created lab 1 for all of them.
The CS2100 TA keys in the command editlab -ln 1 -nln 2 -ts 20.
The mechanism is as described below:
-
Upon detecting
editlabas the command word.ProgrammerErrorParserwill create aEditLabCommandParserwith the input lab number, new lab number and total score. -
EditLabCommandParserparses the lab number, new lab number and total score and creates aLabObject. It will then create aEditLabCommandwith the existing Lab Object, the new Lab Object and the total score. -
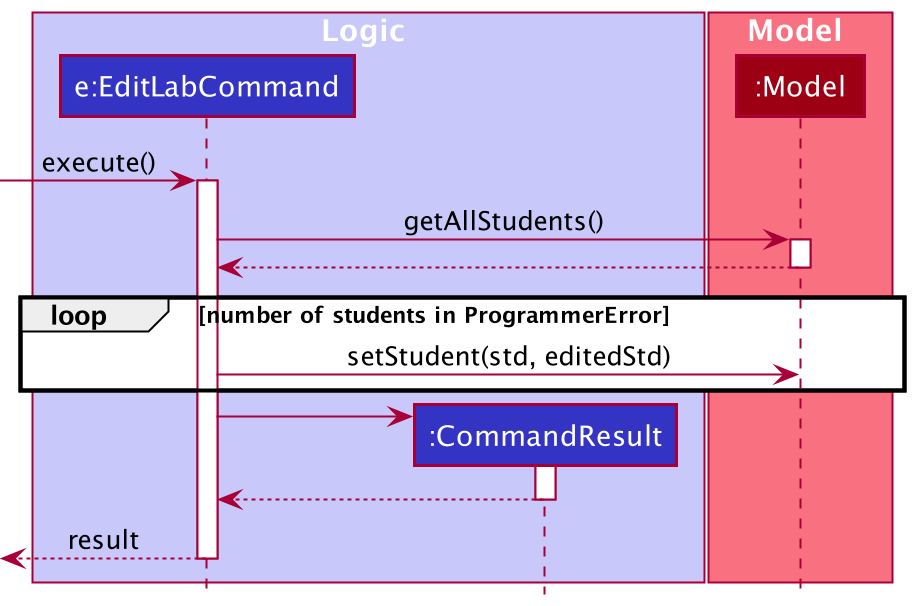
EditLabCommandreceives the existing Lab Object, new Lab Object and total score. It then checks if the original lab exists, if the new lab does not exist and the total score is a valid number. - If the original lab exists, new lab does not exist and total score is a valid number, the lab will be edited for all the students in the list.
- ProgrammerError will then show a success message for editing the lab. For example,
Updated Lab 1!in theresultDisplay, informing the user that the editlab operation is valid.
The following sequence diagram in Figure 5.4.1 shows how the editlab command works:
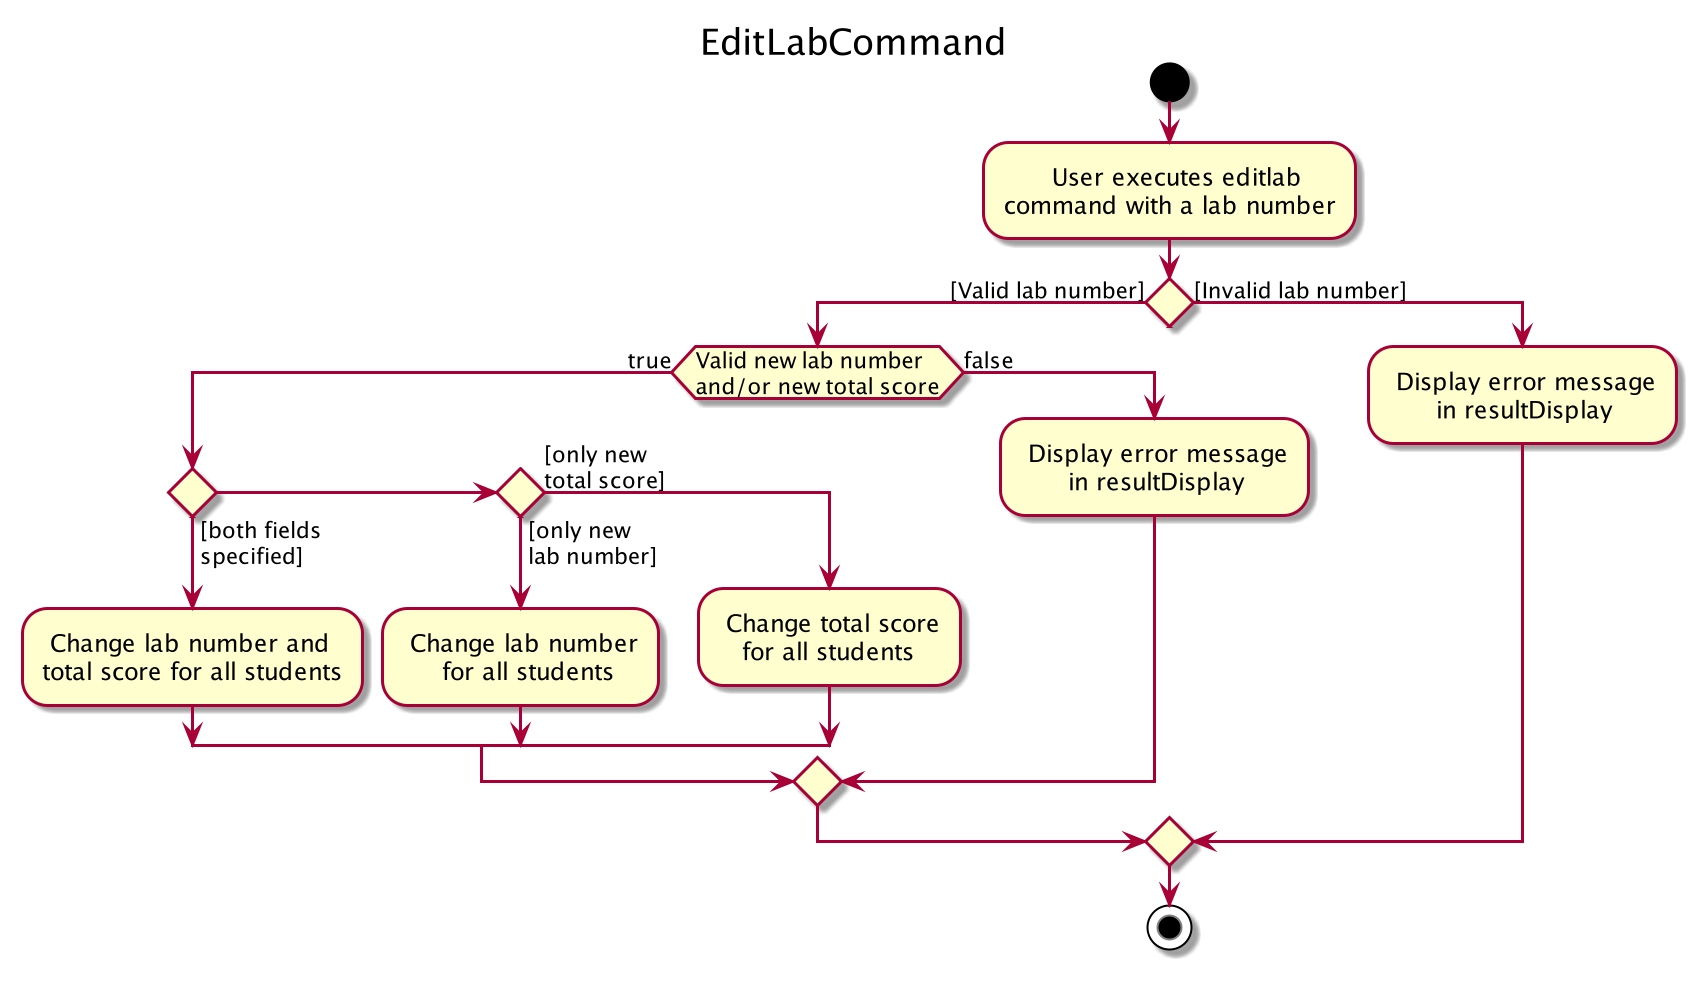
The following activity diagram in Figure 5.4.2 summarizes what happens when a CS2100 TA executes a new command:
Design considerations:
Aspect: How Edit Lab Results executes:
-
Alternative 1 (current choice): The lab is edited individually for each Student.
- Pros: Easier to implement; Easier to keep track of lab classes and have separate instances to lower dependency.
- Cons: Inefficient; Need to loop through each individual student.
-
Alternative 2: An ObservableList of all lab templates without actual score in ProgrammerError itself.
- Pros: Potential improvement in performance by only needing to change one list for all students.
- Cons: Hard to implement, as we have to ensure that students refer to latest ObservableList of lab templates for their own scores and will still need to create a copy of the template for their own reference.
5.5 Download Data Feature
The download data feature allows the CS2100 TA to download student data as a CSV file in a directory location of their choice.
Implementation
The implementation details of this feature can be found mainly in MainWindow as most of the necessary operations are
related to the UI. In addition, the following classes are utilized:
-
DownloadCommand: for generating theDownloadCommandResult -
DownloadCommandResult: for displaying the feedback to the CS2100 TA -
MainWindow.fxml: for the addition of a ‘Download’ button on the MainWindow -
Popup.css: for the customisation of styles for pop-up messages
The download command works in a similar fashion to the show command in the Logic components, except that it does
not require its own parser.
The following sequence diagram in Figure 5.5.1 shows how the download command works in greater detail.
- After receiving a
DownloadCommandResultfrom theLogiccomponent, theMainWindowhandles the download by first callingJsonUtil.getJsonData(filePath)to get the JSON student data from the default storage locationprogrammerError.json. - The
MainWindowthen prompts the user to select a directory to save the CSV file to be created to. - Finally, the
MainWindowcalls theJsonUtil.writeCSV(jsonData, file)method to write the CSV file to the selected directory.

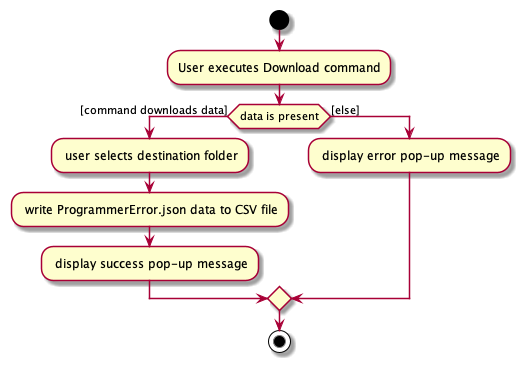
The following activity diagram in Figure 5.5.2 summarizes what happens when a CS2100 TA executes the download command.
The main two possible scenarios are:
- There is student data present to download. If so, the user proceeds to select a destination folder and the data will
be stored in a file named
programmerError.csvin the selected directory. - There is no student data present to download. In this case, the user is simply notified that there is no data to download.
Design Considerations
One of the main considerations was to deal with reading and writing files only when necessary. This meant checking if there is any data to begin with. Only if there exists any data will the CS2100 TA be prompted to select a directory location.
Additionally, a pop-up message was chosen to be displayed for two reasons.
- First, it provides the user a clear visual indicator of the result of their command, as compared to the typical textual output they would see.
- Second, using a pop-up message right at the end of this operation means we can customize the message depending on whether the download was a success. This is because we would only know whether the data was successfully downloaded or not after the textual response is shown to the user.
Alternatives
-
One alternative could be to not use a third-party package (
org.json), and instead manually parse the json file and write the corresponding values to a CSV file which ProgrammerError would create. We chose not to go down this route as it is much more tedious with little reward in terms of code management and code quality. -
Another alternative with respect to the CS2100 TA experience could be to disallow the user from selecting a folder to save their data to. Instead, a default location could be chosen so as to save the CS2100 TA some time in getting their data downloaded quickly. However, since we wanted to make ProgrammerError more flexible and adaptable to different users, we opted to include the functionality of allowing the CS2100 TA to select a folder destination.
5.6 Purge Feature
Implementation
The purge feature allows the CS2100 TA to purge all existing sample or user data from ProgrammerError. Its implementation introduces the following classes:
-
PurgeCommandthat extendsCommand
The syntax of this command is purge.
For instance,purge asks ProgrammerError to purge all data from it.
Given below is a possible usage scenario:
The CS2100 TA keys in the command purge.
The mechanism is as described below:
- Upon detecting ‘purge’ as the command word.
ProgrammerErrorParserwill create aPurgeCommand. -
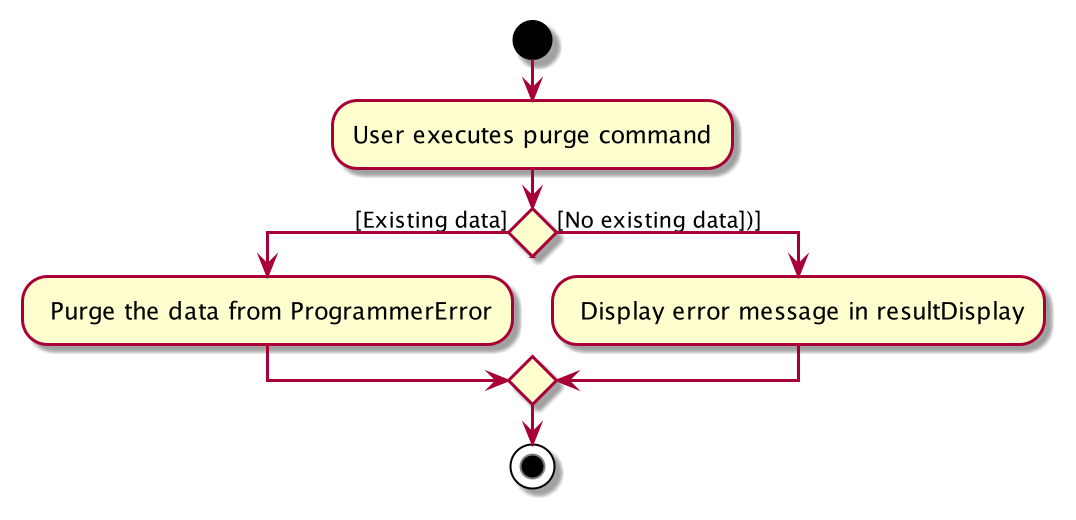
PurgeCommandthen checks if the model has students or not. - If there is some data in the model, all data will be purged.
- ProgrammerError will then show a success message for purging the data. For example,
ProgrammerError has been purged of data!in theresultDisplay, informing the user that the purge operation is valid.
The following sequence diagram in Figure 5.6.1 shows how the purge command works:

The following activity diagram in Figure 5.6.2 summarizes what happens when a CS2100 TA executes a new command:
Design considerations:
Aspect: When the command should purge data:
-
Alternative 1 (current choice): Command purges both sample and existing data
- Pros: Easier to implement; don’t need to check for sample data.
- Cons: User might accidentally purge his/her own data.
-
Alternative 2: Additionally Ask yes or no for purge data as a safety check.
- Pros: Prevents user from accidentally deleting his/her own data
- Cons: Hard to implement, as we have to distinguish between sample data and user data. Need to implement a new prompt from scratch.
5.7 [Proposed] Undo/redo feature
Proposed Implementation
The proposed undo/redo mechanism is facilitated by VersionedProgrammerError. It extends ProgrammerError with an
undo/redo history, stored internally as an programmerErrorStateList and currentStatePointer. Additionally, it
implements the following operations:
-
VersionedProgrammerError#commit()— Saves the current ProgrammerError state in its history. -
VersionedProgrammerError#undo()— Restores the previous ProgrammerError state from its history. VersionedProgrammerError#redo()- ores a previously undone ProgrammerError state from its history.
These operations are exposed in the Model interface as Model#commitProgrammerError(), Model#undoProgrammerError()
and Model#redoProgrammerError() respectively.
Given below is an example usage scenario and how the undo/redo mechanism behaves at each step.
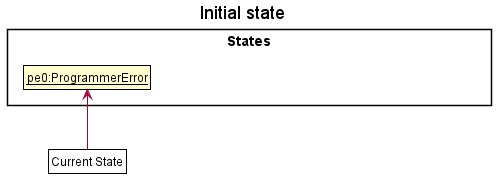
Step 1. The user launches the application for the first time. The VersionedProgrammerError will be initialized with the
initial ProgrammerError state, and the currentStatePointer pointing to that single ProgrammerError state as seen in
Figure 5.7.1.
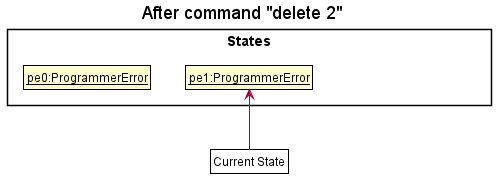
Step 2. The user executes delete 5 command to delete the 5th student in the ProgrammerError. The delete command
calls Model#commitProgrammerError(), causing the modified state of the ProgrammerError after the delete 5 command executes
to be saved in the programmerErrorStateList, and the currentStatePointer is shifted to the newly inserted ProgrammerError
state as seen in Figure 5.7.2.
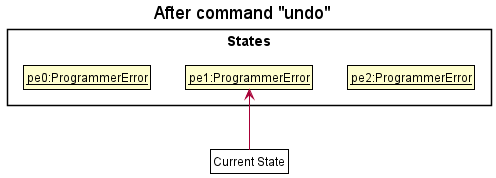
Step 3. The user executes add -n David … to add a new student. The add command also
calls Model#commitProgrammerError(), causing another modified ProgrammerError state to be saved into
the programmerErrorStateList as seen in Figure 5.7.3.

Model#commitProgrammerError(), so the ProgrammerError state will not be saved into the programmerErrorStateList.
Step 4. The user now decides that adding the student was a mistake, and decides to undo that action by executing
the undo command. The undo command will call Model#undoProgrammerError(), which will shift the currentStatePointer
once to the left, pointing it to the previous ProgrammerError state, and restores the ProgrammerError to that state as
seen in Figure 5.7.4.
currentStatePointer is at index 0, pointing to the initial ProgrammerError state, then there are no previous ProgrammerError states to restore. The undo command uses Model#canUndoProgrammerError() to check if this is the case. If so, it will return an error to the user rather
than attempting to perform the undo.
The following sequence diagram in Figure 5.7.5 shows how the undo operation works:
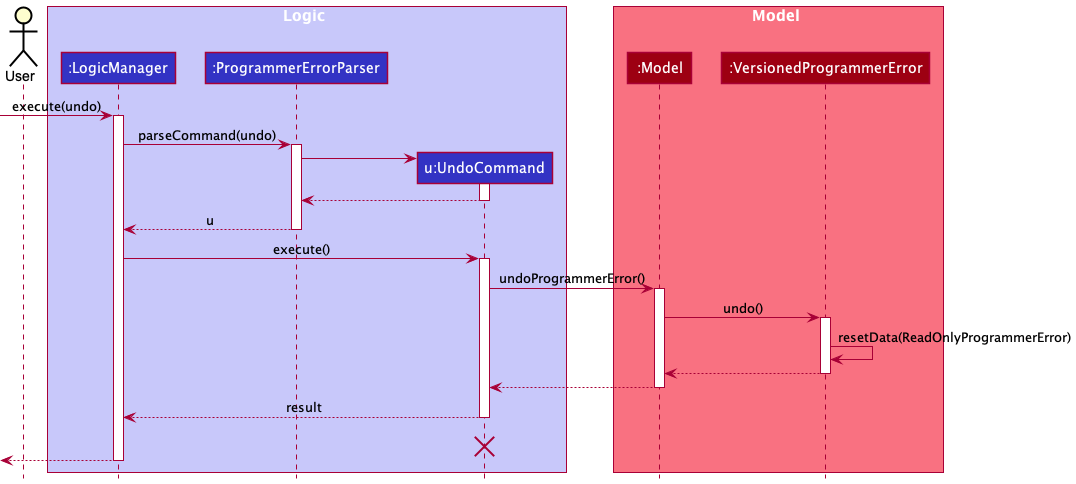
UndoCommand should end at the destroy marker (X) but due to a limitation of PlantUML, the lifeline reaches the end of diagram.
The redo command does the opposite — it calls Model#redoProgrammerError(), which shifts the currentStatePointer once
to the right, pointing to the previously undone state, and restores the ProgrammerError to that state.
currentStatePointer is at index pProgrammerErrorStateList.size() - 1, pointing to the latest ProgrammerError state, then there are no undone ProgrammerError states to restore. The redo command uses Model#canRedoProgrammerError() to check if this is the case. If so, it will return an error to the CS2100 TA rather than attempting to perform the redo.
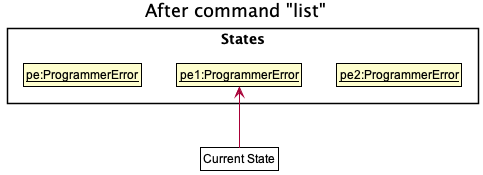
Step 5. The CS2100 TA then decides to execute the command list. Commands that do not modify the ProgrammerError, such
as list, will usually not call Model#commitProgrammerError(), Model#undoProgrammerError() or Model#redoProgrammerError().
Thus, the programmerErrorStateList remains unchanged as seen in Figure 5.7.6.
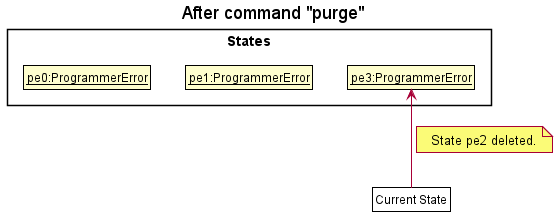
Step 6. The CS2100 TA executes purge, which calls Model#commitProgrammerError(). Since the currentStatePointer is not
pointing at the end of the programmerErrorStateList, all ProgrammerError states after the currentStatePointer will be
purged as seen in Figure 5.7.7. Reason: It no longer makes sense to redo the add -n David … command. This is the behavior that most modern
desktop applications follow.
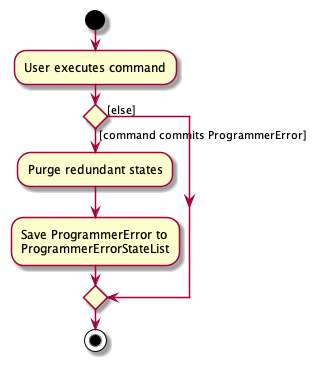
The following activity diagram in Figure 5.7.8 summarizes what happens when a CS2100 TA executes a new command:
Design considerations:
Aspect: How undo & redo executes:
-
Alternative 1 (current choice): Saves the entire ProgrammerError.
- Pros: Easy to implement.
- Cons: May have performance issues in terms of memory usage.
-
Alternative 2: Individual command knows how to undo/redo by itself.
- Pros: Will use less memory (e.g. for
delete, just save the student being deleted). - Cons: We must ensure that the implementation of each individual command are correct.
- Pros: Will use less memory (e.g. for
6. Documentation, logging, testing, configuration, dev-ops
7. Appendix: Requirements
7.1 Product Scope
Target user profile:
CS2100 Lab TAs who
- have to manage a number of students across different classes
- keep track of the students’ lab results
- keep track of the students’ details (eg. Student ID, email)
- prefer and comfortable with CLI tools
- can type fast
- are proficient with Unix commands
- prefer typing to mouse interactions
Value proposition:
CS2100 Lab TAs who use ProgrammerError enjoys greater productivity and efficiency when managing their classes of students.
7.2 User Stories
Priorities: High (must have) - * * *, Medium (nice to have) - * *, Low (unlikely to have) - *
| Priority | As a … | I want to … | So that I can… |
|---|---|---|---|
* * * |
potential CS2100 TA exploring the app | see the app populated with sample data | easily see how the app will look like when it is in use. |
* * * |
CS2100 TA ready to start using the app | purge all current data | get rid of data in the app. |
* * * |
CS2100 TA | be able to create records of individual students: (Name, Student ID, Class ID, email) | so that I can identify and track their progress separately. |
* * * |
CS2100 TA | be able to sort the class records | have an organized class record. |
* * * |
CS2100 TA | delete the details of a student | clear the information of students who have dropped out of the class. |
* * * |
new CS2100 TA | use the in-build help feature | learn how to use the app quickly. |
* * * |
CS2100 TA | be able to view (read) the records of individual students | know more about the student’s current performance and email. |
* * * |
CS2100 TA | be able to update the details of a student | correct any mistakes that I have made. |
* * * |
CS2100 TA | be able to save the data in a CSV file | upload to LumiNUS and share with the CS2100 Instructors. |
* * * |
proficient programmer / CS2100 TA | navigate ProgrammerError seamlessly with the use of Unix command | efficiently manage my class. |
* * |
CS2100 TA with multiple devices | export the data in my ProgrammerError | import it on another device. |
* * |
busy CS2100 TA | view students’ statistics formatted in a standard form | avoid sorting the information on my own. |
* * |
CS2100 TA | use the app to track students’ performance | identify those who need more help. |
* * |
CS2100 TA | know that the software and data will be available 99.999 percent of the time I try to access it | don’t get frustrated and find another software to use. |
* * |
CS2100 TA who is an undergraduate myself | spend little time updating ProgrammerError | have have sufficient time for my other commitments. |
* * |
CS2100 TA with overwhelming work | be greeted with a nice interface | enjoy the process of doing admin tasks. |
* * |
CS2100 TA | upload the students’ lab results to LumiNUS conveniently | |
* * |
impatient CS2100 TA with overwhelming work | be greeted with a nice interface | quickly retrieve a student’s particular/email from the database. |
* * |
CS2100 TA who loves using the keyboard | type commands | practice my typing skills. |
* * |
CS2100 TA | generate weekly feedbacks via email for my students with ease | |
* * |
CS2100 admin | have a dashboard to have a bird eye view of my class statistics | be updated quickly on my class progress. |
* * |
CS2100 TA | use tags to identify which labs are marked or unmarked | know which what labs to mark next. |
* |
CS2100 TA with multiple classes | filter the contact list by name, classes, email | easily identify those in the current class. |
* |
CS2100 TA | archive previous batch statistics | compare current batch performance with them |
* |
expert CS2100 TA | archive/hide unused data | avoid being distracted by irrelevant data. |
* |
a CS2100 TA with many students and classes | store vital information of my students | query it when the need arises. |
* |
CS2100 Teaching Staff | easily search and update student’s contact details | I can reach them throughout the module. |
7.3 Use Cases
For all use cases below, the System is the ProgrammerError and the Actor is the
CS2100 Teaching Assistant (CS2100 TA in short), unless otherwise specified.
7.3.1 Use case: UC1 Purge/Delete all sample student records
Precondition: CS2100 TA opens ProgrammerError for the first time
MSS
- CS2100 TA requests to list student records.
- ProgrammerError shows a list of sample student records.
- CS2100 TA requests to purge sample student records.
-
ProgrammerError deletes all sample student records.
Use case ends.
7.3.2 Use case: UC2 Create a student record
MSS
- CS2100 TA requests to list student records.
- ProgrammerError shows a list of student records.
- CS2100 TA specifies the student’s details.
-
ProgrammerError creates a student record.
Use case ends.
Extensions
-
2a. The list is empty.
Use case ends.
-
3a. The student details given are incomplete.
- 3a1. ProgrammerError shows an error message.
Use case resumes at step 3.
-
3b. The student email or ID given are not unique.
- 3b1. ProgrammerError shows an error message.
Use case resumes at step 3.
7.3.3 Use case: UC3 Upload student records
MSS
- CS2100 TA requests to upload student records from a CSV file.
- ProgrammerError requests for the TA to select a CSV file.
-
ProgrammerError uploads the student records from the CSV file.
Use case ends.
Extensions:
-
2a. CS2100 TA chooses to cancel the upload.
Use case ends.
-
3a. CSV file data is invalid.
- 3a1. ProgrammerError informs the TA of the error.
Use case ends.
7.3.4 Use case: UC4 View a student record
MSS
- CS2100 TA requests to list student records.
- ProgrammerError shows a list of student records.
- CS2100 TA requests to view a specific student record.
-
ProgrammerError shows the student record’s details.
Use case ends.
Extensions
-
2a. The list is empty.
Use case ends.
-
3a. The given index is invalid.
- 3a1. ProgrammerError shows an error message.
Use case resumes at step 2.
7.3.5 Use case: UC5 Delete a student record
MSS
- CS2100 TA requests to list student records.
- ProgrammerError shows a list of student records.
- CS2100 TA requests to delete a specific student record in the list.
-
ProgrammerError deletes the student record.
Use case ends.
Extensions
-
2a. The list is empty.
Use case ends.
-
3a. The given index is invalid.
- 3a1. ProgrammerError shows an error message.
Use case resumes at step 2.
7.3.6 Use case: UC6 Edit a student record
MSS
- CS2100 TA requests to list student records.
- ProgrammerError shows a list of student records.
- CS2100 TA requests to edit a specific student record.
-
ProgrammerError updates the student record.
Use case ends.
Extensions
-
2a. The list is empty.
Use case ends.
-
3a. The given index is invalid.
- 3a1. ProgrammerError shows an error message.
Use case resumes at step 2.
-
3b. CS2100 TA requests to edit a lab number without providing a new lab score
- 3b1. ProgrammerError shows an error message.
Use case resumes at step 2.
7.3.7 Use case: UC7 Download student records
MSS
- CS2100 TA requests to download student data to a CSV file.
- ProgrammerError requests for the TA to select a directory to download the CSV file to.
-
ProgrammerError downloads the student data to a CSV file in the chosen directory.
Use case ends.
Extensions:
-
1a. CS2100 TA chooses to cancel the download.
Use case ends.
-
3a. There is no student data.
- 3a1. ProgrammerError informs the TA there is no data to download.
Use case ends.
7.3.8 Use case: UC8 Create a lab record
MSS
- CS2100 TA requests to create a new lab record.
- ProgrammerError requests for the lab number and lab total score.
- CS2100 TA specifies the lab number and total score.
-
ProgrammerError creates a lab record for every student.
Use case ends.
Extensions
- 3a. The given lab number is not unique, or lab number not an integer between 1 and 13 (inclusive), or lab score not a positive integer between 1 and 100 (inclusive).
-
3a1. ProgrammerError shows an error message.
Use case resumes at 2.
Use case ends.
-
7.3.9 Use case: UC9 Edit a lab record
MSS
- CS2100 TA requests to view a particular student’s record using a show command (UC3) .
- ProgrammerError show the student’s record.
- CS2100 TA specifies lab number and actual score or total score.
-
ProgrammerError updates the student’s record.
Use case ends.
Extensions
- 3a. The given lab score is not a positive integer between 1 and 100 (inclusive), or actual score > total score.
-
3a1. ProgrammerError shows an error message.
Use case resumes at 2.
Use case ends.
-
7.3.10 Use case: UC10 View dashboard of student records
MSS
- CS2100 TA requests to view the dashboard of student data.
- ProgrammerError displays the dashboard showing the number of students, classes, labs. as well as the number of labs unmarked for each class.
-
ProgrammerError automatically updates the dashboard when changes are made to the student data.
Use case ends.
7.3.11 Use case: UC11 Filter student records
MSS
- CS2100 TA requests to list student records.
- ProgrammerError shows a list of student records.
- CS2100 TA requests to filter the records based on certain parameters.
-
ProgrammerError displays a filtered list of student records.
Use case ends.
Extensions
-
2a. The list is empty.
Use case ends.
7.4 Non-Functional Requirements
- Should work on any mainstream OS as long as it has Java
11or above installed. - A TA with above average typing speed for code should be able to accomplish most of the tasks faster using commands than using the mouse.
- The data should be stored locally and should be in a human editable CSV file.
- The product should be for a single user at a time (i.e. not a multi-user product).
- No DBMS should be used to store data.
- The software should follow the Object-oriented paradigm primarily. (with the possibility of allowing a mix of other styles when justifiable).
- The final product should be a result of evolving the given code base. (i.e. allowed to replace all existing code with new code, as long as it is done incrementally)
- The GUI should work well (i.e., should not cause any resolution-related inconveniences to the user) for standard screen resolutions 1920x1080 and higher, and screen scales 100% and 125%.
- the GUI should be usable (i.e., all functions can be used even if the user experience is not optimal) for resolutions 1280x720 and higher, and screen scales 150%.
8. Appendix: Instructions for manual testing
Given below are instructions to test the app manually.
8.1 Launch and Shutdown
- Initial launch
- Download the jar file and copy into an empty folder
- Double-click the jar file Expected: Shows the GUI with a set of sample contacts. The window size may not be optimum.
- Saving window preferences
- Resize the window to an optimum size. Move the window to a different location. Close the window.
- Re-launch the app by double-clicking the jar file.
Expected: The most recent window size and location is retained.
8.2 Deleting a Student
- Deleting a student while all students are being shown
-
Prerequisites: List all students using the
listcommand. Multiple students in the list. -
Test case:
delete 1
Expected: First student is deleted from the list. Details of the deleted student shown in the result display box. -
Test case:
delete 0
Expected: No student is deleted. Error details shown in the result display box. -
Other incorrect delete commands to try:
delete,delete x(where x is larger than the list size)
Expected: Similar to previous.
8.3 Show a Student’s Lab Results
- Showing a student’s lab results while all students are being shown
- Prerequisites: List all students using the
listcommand. Multiple students in the list. - Test case:
show 1shows the information and list of lab results of the student with index 1 on the right panel. - Test case:
show 0
Expected: Error details shown in the result display box. The last shown student’s lab results remains on the right panel.
- Prerequisites: List all students using the
- Updating shown content for student-related features
- Prerequisites: There is at least 1 student in ProgrammerError’s storage.
- Test case (AddCommand):
- Add a student by keying in
add -n Sherwin -sid A1234567X -cid B01 -email e0542421@u.nus.edu - The information shown on the right panel is updated to show Sherwin’s information, with a list of unmarked labs that all other students have.
- Add a student by keying in
- Test case (DeleteCommand):
- Delete a student by keying in
delete 1 - The information shown on the right panel is cleared.
- Delete a student by keying in
- Test case (EditCommand):
- Edit a student by keying in
edit 1 -n John Doe - The information shown on the right panel is updated to show the student whose name is edited to
John Doe.
- Edit a student by keying in
- Updating shown content for lab-related features
- Prerequisites: There are at least 1 student in ProgrammerError’s storage.
- Test case (AddLabCommand):
- Add a lab for all students by keying in
addlab -ln 1 -ts 20, assuming that Lab 1 does not exist. - If the right panel is currently empty, it remains to be empty.
- If the right panel is showing a student’s lab results, a red
Lab1tag and a Lab card with titleLab1, actual score-and total score20is added.
- Add a lab for all students by keying in
- Test case (DeleteLabCommand):
- Delete a lab for all students by keying in
deleteLab -ln 1, assuming that Lab 1 already exists. - If the right panel is currently empty, it remains to be empty.
- If the right panel is showing a student’s lab results, the
Lab1tag and the Lab card with titleLab1is deleted.
- Delete a lab for all students by keying in
- Test case (EditLabCommand):
- Edit a lab for all students by keying in
editlab -ln 1 -nln 2, assuming that Lab 1 already exists. - If the right panel is currently empty, it remains to be empty.
- If the right panel is showing a student’s lab results, the
Lab1tag is updated toLab2and the Lab card with titleLab1is edited to have titleLab2.
- Edit a lab for all students by keying in
8.4 Upload Data
- Select CSV file from file chooser window to upload data from:
- To cancel, click ‘cancel’ to return to the main window.
- If the data in the CSV file is valid, ProgrammerError will save the student data.
8.5 Download Data
- Select folder from directory chooser window to save data to:
- To cancel, click ‘cancel’ to return to the main window.
- In the chosen folder, ProgrammerError will save a CSV file of the students’ data named
programmerError.csv.
8.6 Dashboard
- Enter dashboard as a command or press F5 to view the dashboard.
- CS2100 TA will be able to view the number of students, number of classes, number of labs.
- CS2100 TA will also be able to see the number of labs left to mark for each class.
9. Appendix: Effort
The following is a non-exhaustive list of challenges we encountered during the development of ProgrammerError:
9.1 Rewriting the Command Syntax
- This was challenging as it required a nuanced understanding of how CLI syntax is constructed and following standard conventions.
- Not all of us were familiar with Unix syntax, which made it more difficult to design a solution that would be suitable for users who prefer typing.
9.2 Designing New UI components
- AB3 uses simple components with an (arguably) poor user interface (UI) and user experience (UX). On the other hand, our team revamped the look and feel of the application, customizing the dark theme specially (using GitHub’s color scheme) to suit TAs. This involved much experimentation with color schemes and building new components, such as popup windows to enhance the user experience.
- Other examples include: color-coding the labs which are marked or unmarked (displayed as green or red respectively), as well as customizing the Help window and Dashboard Window to incorporate our new Dark Theme.
9.3 Working with Third-Party Libraries
- Compared to AB3 which uses minimal third-party libraries for its features, our team integrated two additional external libraries to develop our
uploadanddownloadfeatures. - This was more challenging than it initially seemed as it required trying out multiple potential candidate libraries to find those which are most suitable for our use case and would be compatible across multiple operating systems.
- Through this process, we also encountered dependency issues with the new libraries and spent significant time and effort debugging these issues.
9.4 Implementing Dynamic Features
- AB3’s features typically work by having the user type in text commands to be executed. We felt this was core, but we wanted to go a step further and implement our features to minimize the TA having to type unnecessary commands.
- For instance, the list of students always remains sorted whenever updates are made to the student data. This required many checks and careful organization of the student data so that the sorting can be done efficiently at minimal cost to the user TA.
- Additionally, the
showpanel anddashboardwindow were also designed to update dynamically whenever changes are made to the student data. This saves the TA much time in keeping track of the labs they have yet to mark, thereby enhancing their user experience and satisfaction.