User Guide
ProgrammerError (PE) is a desktop app for managing students’ information, optimized for use via a Command Line Interface (CLI) while still having the benefits of a Graphical User Interface (GUI). Designed for CS2100 Lab Teaching Assistants (TAs), this application is optimized to track personal particulars, emails and lab results of your students across different classes. If you are familiar with Unix commands, this is definitely for you!
Table of Contents
- Glossary
- Quick Start
- Features
- Command Summary
Glossary
- Student ID: NUS student matriculation number (AXXXXXXXY)
- Email: NUS student email (eXXXXXXX@u.nus.edu)
- TA: CS2100 lab teaching assistant
- PE: ProgrammerError
- CSV: Comma-Separated Values
Quick Start
- Ensure you have
Java 11or above installed in your Computer. - Download the latest
programmerError.jarfrom here. - Copy the file to the folder you want to use as the home folder for your ProgrammerError.
- Double-click the file to start the app. The GUI similar to the below should appear in a few seconds. Note how the app
contains some sample data.

- Type the command in the command box and press Enter to execute it. For example, typing
helpand pressing Enter will open the help window.
Here are some example commands you can try:-
add -n Sherwin -sid A1234567X -cid B01 -email e0523451@u.nus.edu: Adds a student namedSherwinto PE with his Student ID, Class ID and Email. -
edit 1 -n Sherwin: Updates the name of the student at index 1 of the displayed list (1-indexed) to Sherwin. -
delete 1: Deletes the student at index 1 of the displayed list (1-indexed). -
filter -sid A1234567X: Filters the list of students to display the student(s) whose student ID containsA1234567X(case-insensitive).
-
- Refer to the Features below for details on all available commands. Take note that command parameters
wrapped with
[]listed in this guide signifies that the parameter is optional.
Features
Notes about the command format (Unix Command Syntax):
- Similar to Unix CLI, the up and down arrow keys can be used to navigate the history of commands executed.
- Up Arrow Key: Navigate to an older command.
- Down Arrow Key: Navigate to a more recent command.
- Command will only be stored after
Enterhas been pressed.
- Flags will be used to specify different options for the commands. For example, the
-sidflag can be used to specify a student’s student ID. - Parameters can be in any order.
e.g. if the command specifies-n <NAME> -sid <STUDENT_ID>,-sid <STUDENT_ID> -n <NAME>is also acceptable. - If a parameter is expected only once in the command, but you specified it multiple times, only the last occurrence
of the parameter will be taken.
e.g. if you specify-n Allard -n Xian Yi, only-n Xian Yiwill be taken. - Extraneous parameters for commands that do not take in parameters (such as
help,exitandpurge) will be ignored. e.g. if the command specifieshelp 123, it will be interpreted ashelp.
1. Parameter Summary
filter command.
filter command filters the list based on partial character sequence matching and hence does not have to follow the constraints strictly.
| Parameter | What it means | Constraints |
|---|---|---|
| -n | Name of Student | Alphanumeric characters and spaces |
| -sid | Student ID of Student | AXXXXXXXY, where X is a digit from 0 to 9 and Y is an alphabet |
| -cid | Class ID of Student | BXX, where X is a digit from 0 to 9 |
| Email of Student | eXXXXXXX@u.nus.edu, where X is a digit from 0 to 9 | |
| -ln | Lab Number | An integer between 1 and 13 (inclusive) |
| -nln | New Lab Number | An integer between 1 and 13 (inclusive) |
| -ts | Lab Total Score | A positive integer between 1 and 100 (inclusive) |
| -s | Lab Score of Student | A non-negative integer, not greater than the corresponding lab total score |
2. General Features
2.1 View Help: help or F2 on keyboard
Shows a message explaining how to access the help page.
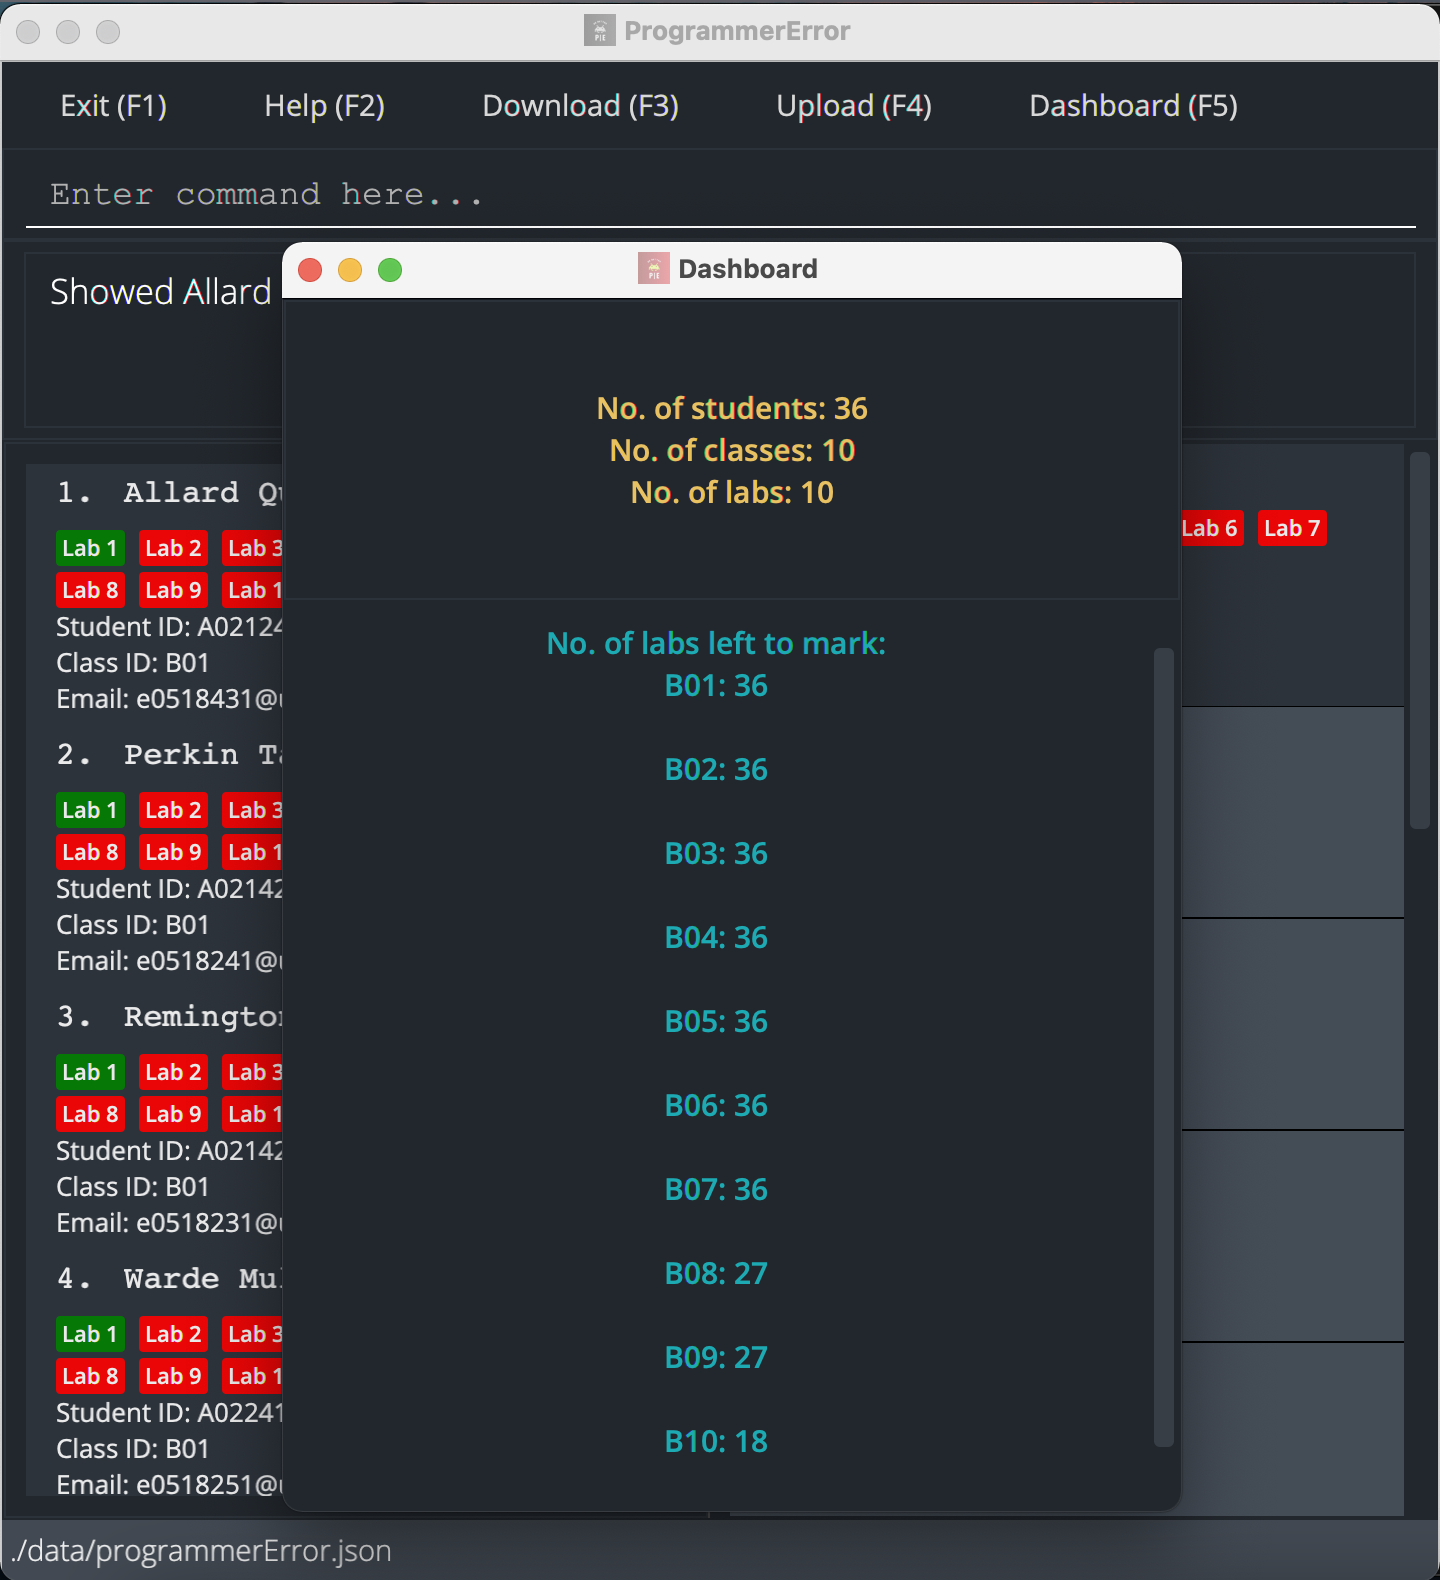
2.2 View Dashboard: dashboard
Displays a dashboard window that updates dynamically showing the following data:
- Number of students
- Number of classes
- Number of labs
- Number of labs unmarked for each class
Below is an example of a dashboard window when the dashboard command is executed.
2.3 Exit: exit or F1 on keyboard
Exits ProgrammerError and closes the GUI.
3. Data Features
3.1 Fill Sample Data: fill
Fills the program with sample data if no data is already present. Otherwise, throws an error message.
3.2 Purge all Data: purge
Clears all data in PE. This can be used to delete pre-existing sample data or existing student data. Otherwise, throws an error if no pre-existing data.
3.3 Upload Data: upload or F4 on keyboard
Uploads student data via a CSV file with the following header: studentId,classId,name,email. Note that the data
should contain only the student ID, class ID, name and email field respectively and spaces directly before or after
commas should be avoided.
Here is an example CSV file on GitHub. You may download files from GitHub following the instructions here.
![]() Note:
the CSV should not contain students’ lab results since this functionality is only meant for the TA to automate the adding of students to PE.
Note:
the CSV should not contain students’ lab results since this functionality is only meant for the TA to automate the adding of students to PE.
- If there are already existing students, the upload will overwrite the existing data rather than append to it. This is because in a typical use case, the TA would not want to have the existing data kept if they would like to use student data from their own CSV file.
- Furthermore, simply uploading the CSV obtained via the
downloadcommand will result in the file being rejected
In summary:
- Select a valid CSV file (with header:
studentId,classId,name,email) from the file chooser. - Note that this command is not meant for uploading lab results. Rather, it is only for automating the adding of students to PE.
3.4 Download Data: download or F3 on keyboard
Downloads the student data to a CSV file in the chosen directory. The file will be automatically named programmerError.csv.
3.5 Edit The Data File Directly (For advanced users)
Instead of using commands to edit students’ details and lab results, you may change the json file directly.
Note that ProgrammerError will only accept data files fulfilling the restrictions specified in the parameter summary. The absence of an attribute and/or invalid value for an attribute will result in an error message shown in the logger, and ProgrammerError will start with an empty json data file instead.
Here are some examples of corrupted data that is not accepted by ProgrammerError.
  //Absent attribute example: labNumValue attribute is missing
  labResultList" : [ {
  "actualScoreValue" : 10,
  "totalScoreValue" : 20
  }

  //Invalid attribute example: labNumValue is not between 1 to 13
  "labResultList" : [ {
  "labNumValue" : 20,
  "actualScoreValue" : 15,
  "totalScoreValue" : 20
  }
4. Student Features
4.1 Add Student: add
Adds a student to ProgrammerError with their student ID, class ID and email. Both the student ID and email must be unique.
Format: add -n <NAME> -sid <STUDENT_ID> -cid <CLASS_ID> -email <EMAIL>
Example:
-
add -n Sherwin -sid A1234567X -cid B01 -email e0542421@u.nus.eduAdds the student called Sherwin with student ID A1234567X, class ID B01 and email e0542421@u.nus.edu PE.
4.2 Edit Student’s Details or Lab Result : edit
Edits the details or grade of an existing student in PE as specified by the INDEX_IN_LIST argument.
The corresponding fields of the student will be updated according to the input arguments.
- Both the student ID and email must be unique.
- 1-indexing is used here as according to the displayed list.
- Any combination of the optional arguments can be provided.
- At least one of the optional argument must be provided.
- Take note that the parameters
-lnand-sneeds to be specified together.
Format: edit <INDEX_IN_LIST> [-n <NAME>] [-sid <STUDENT_ID>] [-cid <CLASS_ID>] [-email <EMAIL>] [-ln <LAB_NUM> -s <ACTUAL_SCORE>]
Examples:
-
edit 1 -n Elon MuskUpdates the name of the student at index 1 (1-indexed) to ‘Elon Musk’. -
edit 1 -ln 4 -s 29Updates the lab 4 result of the student at index 1 (1-indexed) to 29.
4.3 Delete Student: delete
Deletes the specified student from the PE. Take note that INDEX_IN_LIST is 1-indexed.
Format: delete <INDEX_IN_LIST>
Example:
-
delete 23Deletes the data of the student at index 23
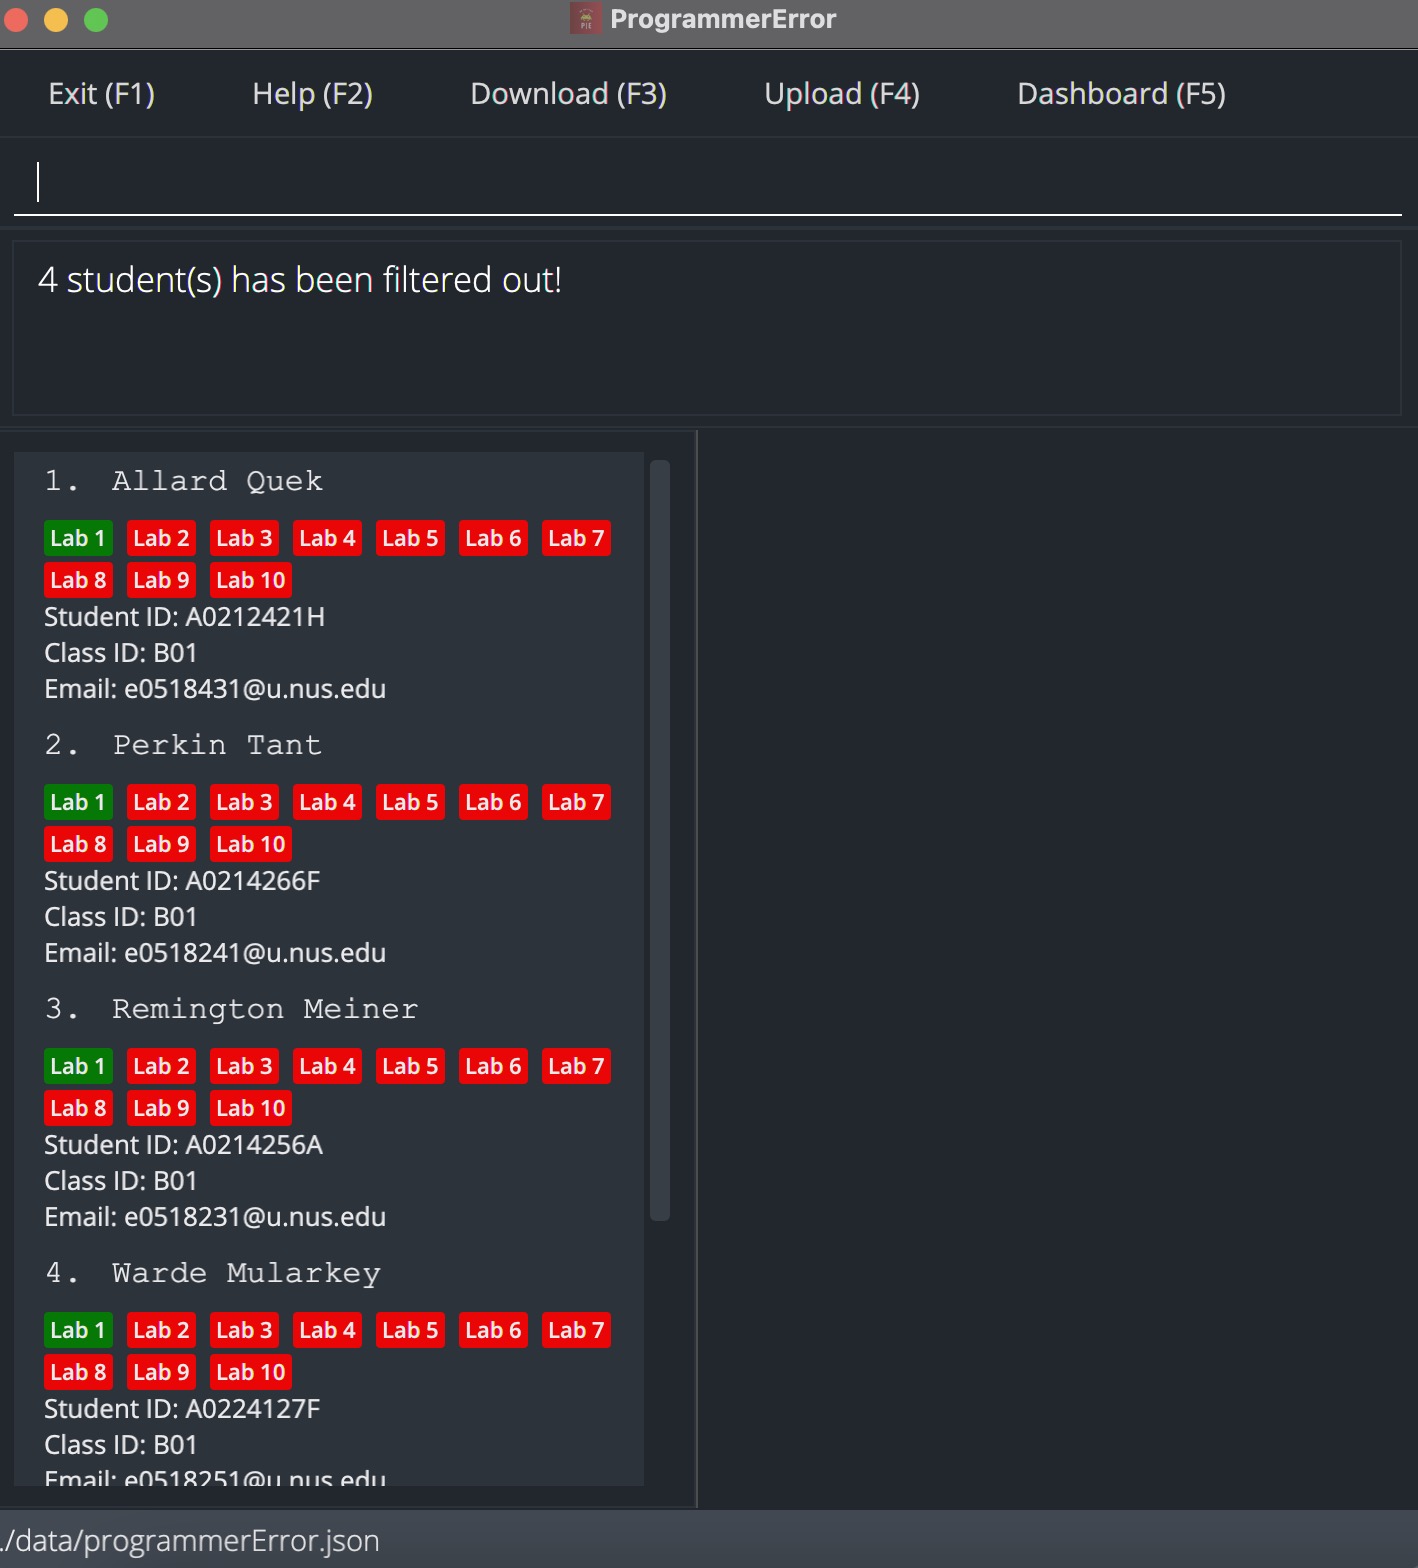
4.4 Filter Students: filter
Filter the students in ProgrammerError based on the specified arguments provided (name, student ID, class ID and email).
- Any combination of the optional arguments can be provided.
- At least one of the optional argument must be provided.
- Arguments can be provided in any order and are case-insensitive.
- ProgrammerError will display the filtered list of students whose details matches all the specified arguments.
- The arguments are matched to the corresponding details as long as the details of the students contains the sequence of characters provided in the argument string.
-
filtercommand does not follow the constraints as specified in parameter summary.
Format: filter [-n <NAME>] [-sid <STUDENT_ID>] [-cid <CLASS_ID>] [-email <EMAIL>]
Below shows an example when filter -cid B01 is executed with 4 students from class B01 filtered out.
Examples:
-
filter -sid A1234567XLists all students whose student ID containsA1234567X. -
filter -n abcLists all students whose name containsabc. -
filter -cid B01Lists all students whose class ID contains the character sequenceB01. -
filter -email e1234567Lists all students whose email contains the character sequencee1234567. -
filter -n Sherwin -cid B01Lists all students whose name contains the character sequenceSherwinand belongs to a class with the class ID containing the character sequenceB01.
4.5 Show Student Details: show
Shows a particular student’s details including their scores for each lab.
The student particular and lab results will be updated if other commands modify their fields.
Format: show <INDEX_IN_LIST>
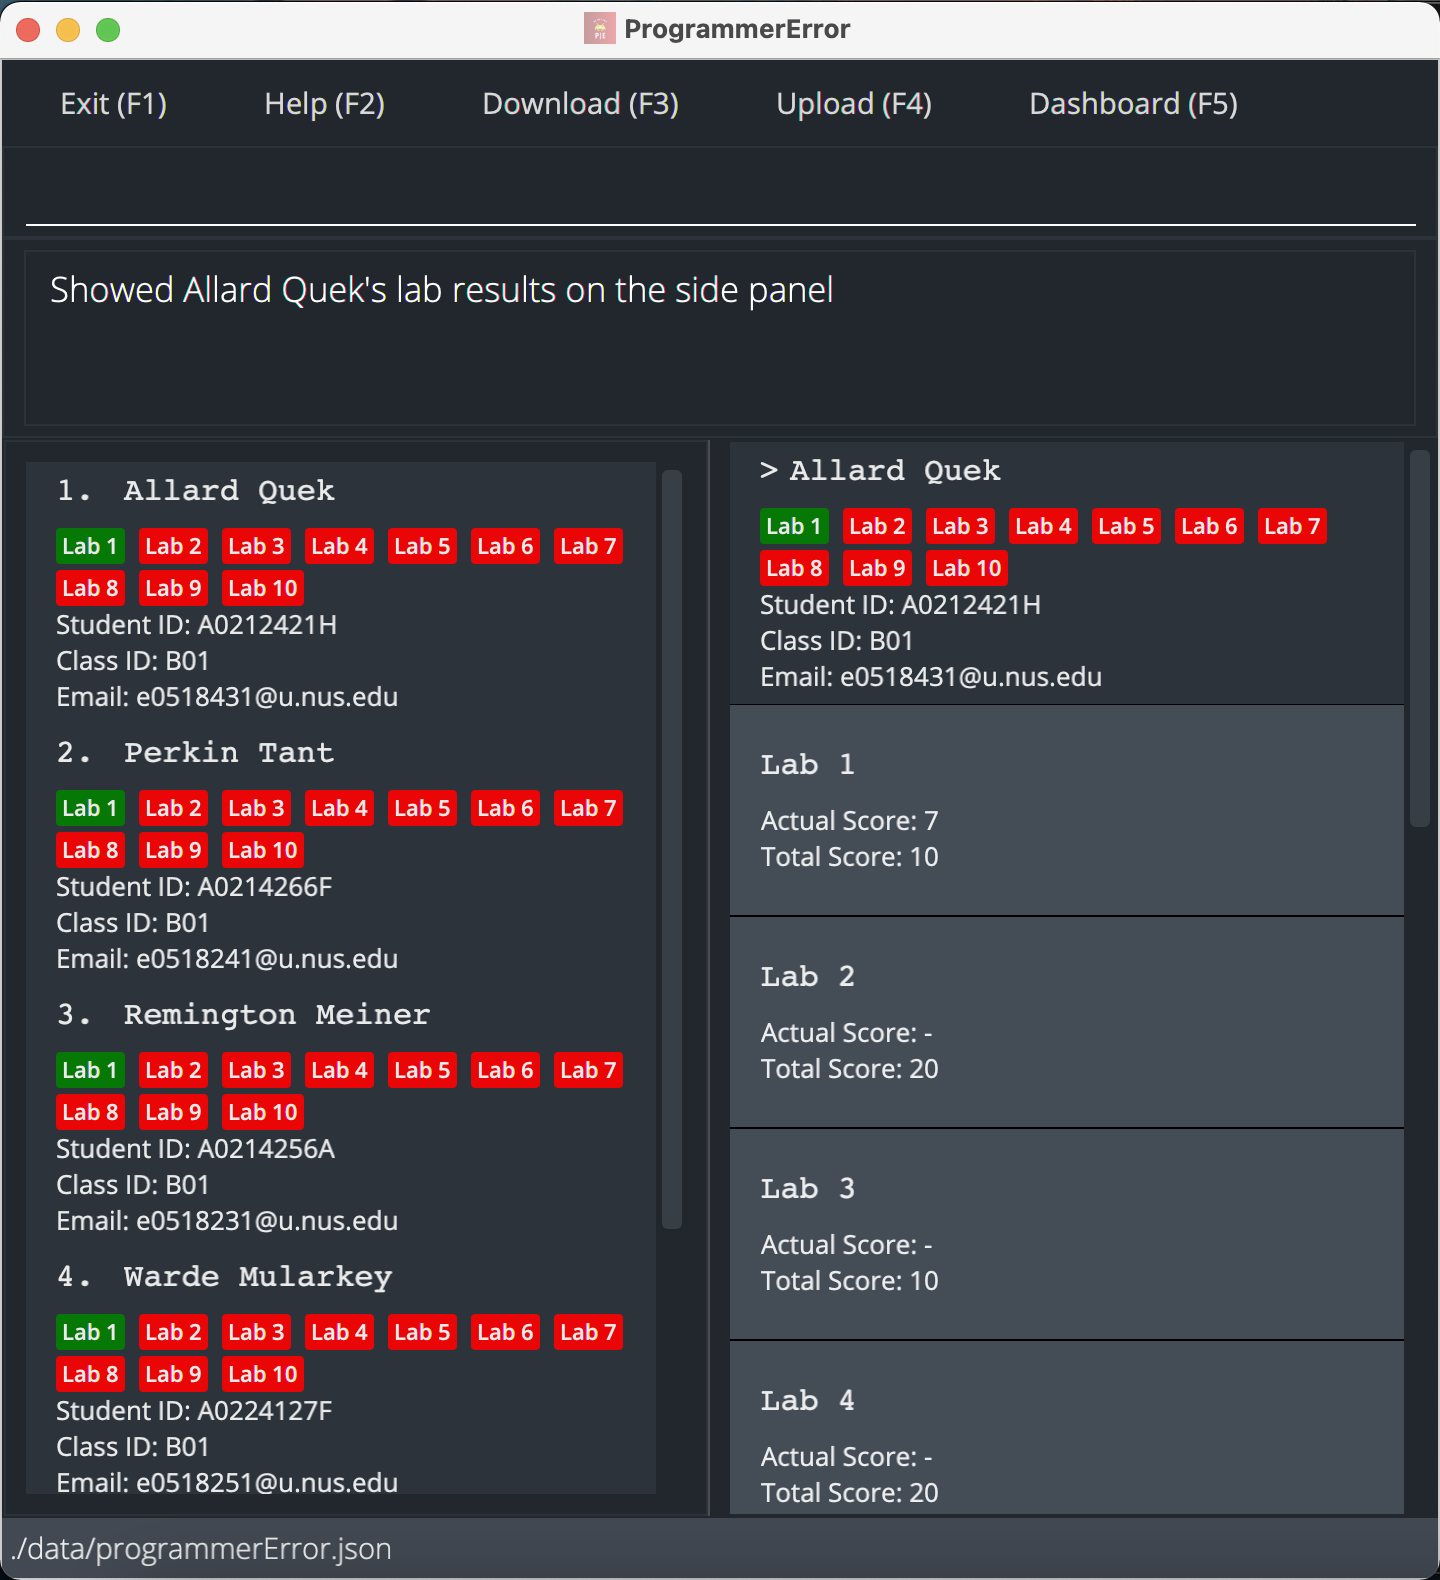
Example:
-
show 1Shows the particulars and lab results of student at index 1 as displayed in the list.
4.6 List All Students: list
Displays a list of all students in the left panel. This list is ordered first by class ID followed by student name.
5. Lab Features
5.1 Add Lab: addlab
Adds a lab to every student with the lab number and total score.
Format: addlab -ln <LAB_NUM> -ts <TOTAL_SCORE>
Examples:
-
addlab -ln 1 -ts 20Adds a lab with number 1 and total score 20 for all students. -
addlab -ln 2 -ts 30Adds a lab with number 2 and total score 30 for all students.
5.2 Edit Lab: editlab
Edits the details of an existing lab for every student.
- Any combination of the optional arguments can be provided.
- At least one of the optional argument must be provided.
Format: editlab -ln <LAB_NUM> [-nln <NEW_LAB_NUM>] [-ts <NEW_LAB_SCORE>]
Examples:
-
editlab -ln 1 -ts 30Changes the total score of lab 1 to 30 for all students. -
editlab -ln 1 -nln 2Changes the number of an existing lab from 1 to 2 for all students. -
editlab -ln 1 -nln 2 -ts 30Changes the number of an existing lab from 1 to 2 and the total score of the same lab to 30 for all students.
5.3 Delete Lab: dellab
Deletes an existing lab from every student in ProgrammerError.
Format: dellab -ln <LAB_NUM>
Example:
-
dellab -ln 1: Deletes lab 1 for all students if it exists.
Command Summary
| Command | Format & Examples |
|---|---|
| Add | add -n <NAME> -sid <STUDENT_ID> -cid <CLASS_ID> -email <EMAIL> |
| Add Lab | addlab -ln <LAB_NUM> -ts <TOTAL_SCORE> |
| Dashboard | dashboard |
| Delete | delete <INDEX_IN_LIST> |
| Delete Lab | dellab -ln <LAB_NUM> |
| Download | download |
| Edit | edit <INDEX_IN_LIST> [-n <NAME>] [-sid <STUDENT_ID>] [-cid <CLASS_ID>] [-email <EMAIL>] [-ln <LAB_NUM> -s <ACTUAL_SCORE>] |
| Edit Lab | editlab -ln <LAB_NUM> [-nln <NEW_LAB_NUM>] [-ts <NEW_LAB_SCORE>] |
| Exit | exit |
| Fill | fill |
| Filter | filter [-n <NAME>] [-sid <STUDENT_ID>] [-cid <CLASS_ID>] [-email <EMAIL>] |
| Help | help |
| Purge | purge |
| Show | show <INDEX_IN_LIST> |
| Upload | upload |